As the sun begins to set, casting a golden hue across my kitchen, I’m reminded of a cherished family tradition: cookie decorating nights. It’s a ritual filled with flour-dusted counters, laughter, and a colorful array of decorating supplies. These evenings, spent shaping dough and crafting delightful treats, have woven themselves into the fabric of my family’s gatherings, creating memories that sparkle just as brightly as the icing on our cookies. The star of these evenings? None other than royal icing, the magical icing that transforms plain cookies into stunning masterpieces.
Recipe Timing
- Prep Duration: 10 minutes
- Active Cooking: 5 minutes
- Total Duration: 15 minutes
- Portion Size: Varies based on cookie quantity
- Complexity: Simple
Nutritional Recipe
- Calories per portion: 30 calories
- Protein: 0g
- Carbs: 8g
- Fats: 0g
- Fiber: 0g
- Sugars: 8g
- Sodium: 0mg
Why You’ll Love This Royal Icing
Royal icing isn’t just another frosting; it’s the icing that holds its shape, stands tall on your cookies, and provides a beautifully glossy finish. This icing is perfect for all those intricate designs you’ve dreamed of creating, from delicate lace patterns to vibrant flooding to create beautiful scenes. Plus, it dries hard, making your cookies incredibly stackable and transportable—ideal for gifting or sharing at parties!
The Complete Cooking Journey
Making royal icing is a straightforward and rewarding process. With just a few ingredients, you will unlock the ability to decorate cookies in ways that make your heart sing. The best part? You can customize the color and flavor, creating a uniquely personal touch that reflects your creativity and style.
Ingredients:
- 2 cups powdered sugar
- 1 tablespoon meringue powder
- Water (as needed)
Method:
### Step 1: Combine the Dry Ingredients
In a mixing bowl, combine the 2 cups of powdered sugar with 1 tablespoon of meringue powder, making sure there are no clumps. This combination forms the base of your royal icing.
### Step 2: Add the Water Gradually
Gradually add water, a teaspoon at a time, stirring gently. Your goal is to achieve a consistency that holds soft peaks. Soft peaks mean the icing should slightly hold its shape when you lift your whisk.
### Step 3: Adjust for Flooding
For flooding (the icing that fills in large areas), you’ll want to thin the icing slightly with additional water until it reaches a pourable consistency. Test it with the back of a spoon—it should spread but not be too runny.
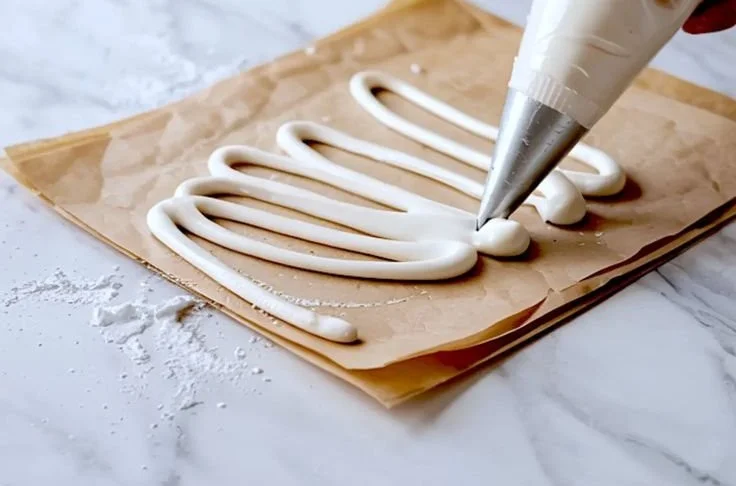
### Step 4: Begin Decorating
Once your royal icing is ready, use it to decorate your cookies as desired! Use piping bags or squeeze bottles for more intricate designs, or an offset spatula for smooth flooding.
Serving Suggestions & Pairings
Royal icing pairs beautifully with a variety of cookie types: sugar cookies, gingerbread, and even shortbread. For a festive touch, pair your decorated cookies with hot cocoa or spiced chai for cozy gatherings.
Storage & Leftovers Guide
If you have leftover royal icing (though I doubt you will!), store it in an airtight container at room temperature. It will keep for about 1-2 days. When ready to use, simply stir gently as it may harden slightly.
Kitchen Wisdom & Success Tips
- Room Temperature: Ensure your powdered sugar is at room temperature to avoid humidity affecting the icing.
- Clean Tools: Always use clean tools to mix the icing; any grease or residue can affect how it sets.
- Coloring Caution: If you plan to add food coloring, gel colors work best as they won’t alter the icing’s consistency.
Flavor Variations & Adaptations
Want to jazz up your royal icing? Consider adding a few drops of vanilla extract or almond extract to elevate the flavor. For a natural color source, beet juice or matcha powder can also add beautiful hues without artificial coloring.
Reader Questions & Solutions
-
What if my icing is too thick?
Slowly add tiny amounts of water until the desired consistency is reached—remember to mix gently. -
Can I use liquid egg whites instead of meringue powder?
Yes, but make sure to use a stabilizer like cream of tartar for better results. -
How can I prevent my icing from becoming too dry while decorating?
Cover your bowl with plastic wrap when not in use to prevent it from drying out. -
How long does it take for royal icing to dry?
It usually dries within 12 hours, but this varies with humidity and thickness of application. -
Can I refrigerate my decorated cookies?
It’s best to store decorated cookies at room temperature to keep royal icing from becoming sticky.
Wrapping Up
Royal icing is not just a simple decorating technique; it’s a ticket to delight, creativity, and connection. I hope you feel inspired to create your own delicious masterpieces that bring joy to your table and cherished moments with loved ones. So gather your materials, put on your favorite music, and let the icing adventure begin! Happy decorating!
PrintRoyal Icing
A magical icing that holds its shape and provides a glossy finish, perfect for cookie decorating.
- Prep Time: 10 minutes
- Cook Time: 5 minutes
- Total Time: 15 minutes
- Yield: Varies based on cookie quantity
- Category: Dessert
- Method: Mixing
- Cuisine: American
- Diet: Vegetarian
Ingredients
- 2 cups powdered sugar
- 1 tablespoon meringue powder
- Water (as needed)
Instructions
- Combine the dry ingredients in a mixing bowl, making sure there are no clumps.
- Add the water gradually, a teaspoon at a time, stirring gently.
- Adjust for flooding by thinning the icing slightly with additional water until it reaches a pourable consistency.
- Begin decorating your cookies once the icing is ready.
Notes
Store leftover icing in an airtight container at room temperature and cover your bowl when not in use to prevent drying.
Nutrition
- Serving Size: 1 serving
- Calories: 30
- Sugar: 8g
- Sodium: 0mg
- Fat: 0g
- Saturated Fat: 0g
- Unsaturated Fat: 0g
- Trans Fat: 0g
- Carbohydrates: 8g
- Fiber: 0g
- Protein: 0g
- Cholesterol: 0mg