
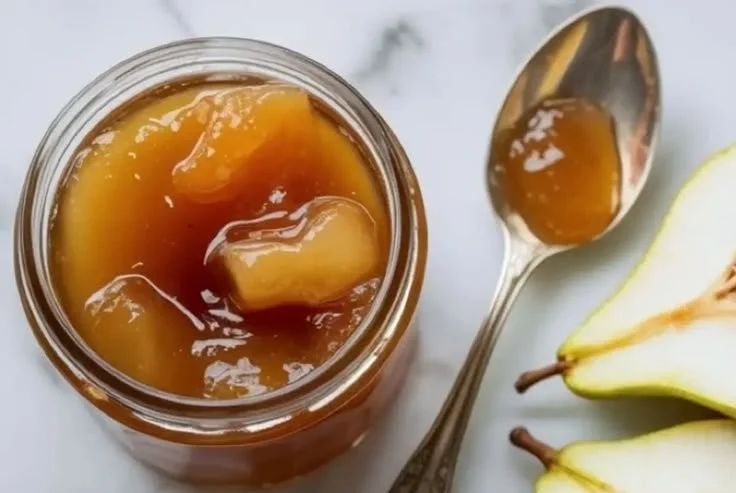
There’s something magical about the moment you take a bite of homemade jam. It’s a burst of sunshine captured in a jar, a sweet memory from summer, and a reminder of the orchard just waiting for you to explore. This pear jam recipe brings to life those unforgettable moments I shared in my grandmother’s kitchen, where the air was filled with laughter and the sweet aroma of caramelized fruit.
As we tackled the task of transforming those ripe, juicy pears into golden jars of jam, I remember how every year felt like a delightful challenge—what new flavors could we add? Would this batch have the perfect balance of tart and sweet? It’s those cherished memories that fuel my passion for cooking, and I can’t wait for you to create your own with this simple yet delicious pear jam.
Recipe Timing
- Prep Duration: 30 minutes
- Active Cooking: 15 minutes
- Total Duration: 45 minutes
- Portion Size: About 4 cups
- Complexity: Simple
Nutritional Recipe
- Calories per portion: Approximately 110
- Protein: 1g per serving
- Carbs: 29g per serving
- Fats: 0g per serving
- Fiber: 1g per serving
- Sugars: 24g per serving
- Sodium: 0mg per serving
Why You’ll Love This Pear Jam
Homemade pear jam is more than just a fruity spread; it’s a versatile culinary delight that enhances both breakfast and dessert. Imagine slathering a generous dollop on your morning toast, or drizzling it over a scoop of vanilla ice cream for an elegant yet simple dessert. This jam captures the essence of ripe pears, with a subtle hint of lemon and a touch of cinnamon that makes each jar feel like a warm hug on a chilly day. Plus, it’s incredibly easy to make—perfect for beginners and seasoned cooks alike!
The Complete Cooking Journey
Getting started with this recipe is like embarking on a cozy adventure in your kitchen. The gentle process of chopping pears and bringing them to life with sugar and lemon juice calms the soul, while the bubbling pot on the stove fills the room with a tantalizing aroma. Let’s dive into the steps to create your very own pear jam!
Ingredients:
- 4 cups chopped pears
- 1/4 cup lemon juice
- 1 cup sugar
- 1/2 teaspoon cinnamon (optional)
- 1 packet pectin
Method:
Step 1: Combine Pears and Lemon Juice
In a large pot, combine the chopped pears with freshly squeezed lemon juice. The lemon juice not only adds a delightful tang but also helps preserve the beautiful color of the pears.
Step 2: Add Sugar and Coat Pears
Next, pour in the sugar and stir the mixture until the pears are well coated. This is where the magic begins as the sugar starts to draw out the natural juices in the fruit!
Step 3: Extract the Juices
Let the mixture sit for about 30 minutes. This allows the pears to release their juices, creating a sweet syrup that will serve as the base for your jam.
Step 4: Stir in Pectin and Options
After the 30 minutes, stir in the packet of pectin and add the cinnamon if you’re feeling adventurous. Bring the mixture to a vigorous boil, stirring constantly.
Step 5: Cook Until Thickened
Cook the jam for about 10-15 minutes, stirring frequently to avoid sticking. You’ll notice the mixture begins to thicken beautifully—it’s the moment you’ve been waiting for!
Step 6: Sterilize Jars and Fill
Meanwhile, sterilize your jars by boiling them or placing them in an oven. Then, carefully pour the hot jam into the sterilized jars, sealing them properly to keep that freshness locked in.
Step 7: Cool and Store
Let the jars cool to room temperature. Once cooled, refrigerate your jam or store it in a cool, dark place. And just like that, you have homemade pear jam ready to spread joy!
Serving Suggestions & Pairings
This pear jam pairs beautifully with a variety of options. Try it on warm, crusty bread or alongside creamy cheeses for a delightful charcuterie board. It’s also fantastic as a filling for pastries or pancakes and adds a delicious twist to yogurt or oatmeal.
Storage & Leftovers Guide
Store your pear jam in sealed jars in the refrigerator for up to 3 months. If properly canned, it can last up to a year in a cool, dark pantry. Just remember, once opened, enjoy it within a few weeks to savor its delightful freshness.
Kitchen Wisdom & Success Tips
- Always make sure to thoroughly sterilize your jars to prolong the shelf life of your jam.
- Use ripe, fresh pears for the best flavor; they should be fragrant and give slightly when pressed.
- If you prefer a smoother texture, blend the pears before cooking to eliminate any chunks.
Flavor Variations & Adaptations
Feel free to experiment! Swap out cinnamon for ginger for a spicier kick, or add a splash of vanilla extract for a sweet twist. You can also mix in other fruits like apples or ginger for different flavor profiles.
Reader Questions & Solutions
-
What kind of pears are best for making jam?
- Bartlett and Bosc pears are excellent choices due to their sweet flavor and soft texture, perfect for jam.
-
Can I use frozen pears?
- Absolutely! Just make sure to thaw and drain them before following the recipe to avoid excess moisture.
-
How can I tell if my jam has set?
- A simple test is the “spoon test”: dip a spoon into the jam, and if it coats the back of the spoon and holds its shape, it’s ready.
-
Do I really need to use pectin?
- Pectin helps your jam set properly, but if you prefer a more natural approach, it can be omitted—but expect it to be less thick.
-
Can I adjust the sugar levels in this recipe?
- Yes! Just keep in mind that reducing sugar can affect the texture and preservation, so balance is essential.
Wrapping Up
Making pear jam is not just a cooking task; it’s a warm invitation to enjoy the sweetness of life. Each jar you fill encapsulates not only the vibrant flavor of pears but also the love and intention behind every stirring motion. So, gather those ingredients, channel your inner jam-maker, and create a delightful treat that you can share with family and friends. Happy cooking!
PrintHomemade Pear Jam
A simple and delicious pear jam capturing the essence of ripe pears, with hints of lemon and cinnamon.
- Prep Time: 30 minutes
- Cook Time: 15 minutes
- Total Time: 45 minutes
- Yield: About 4 cups 1x
- Category: Condiment
- Method: Canning
- Cuisine: American
- Diet: Vegetarian
Ingredients
- 4 cups chopped pears
- 1/4 cup lemon juice
- 1 cup sugar
- 1/2 teaspoon cinnamon (optional)
- 1 packet pectin
Instructions
- Combine pears and lemon juice in a large pot.
- Add sugar and stir until pears are well coated.
- Extract the juices by letting the mixture sit for 30 minutes.
- Stir in pectin and add cinnamon if desired. Bring to a boil, stirring constantly.
- Cook for 10-15 minutes, stirring frequently until thickened.
- Sterilize jars by boiling or placing them in an oven.
- Cool the jars to room temperature after filling them with jam.
Notes
Store in sealed jars in the refrigerator for up to 3 months or in a cool, dark pantry for up to a year.
Nutrition
- Serving Size: 1 tablespoon
- Calories: 110
- Sugar: 24g
- Sodium: 0mg
- Fat: 0g
- Saturated Fat: 0g
- Unsaturated Fat: 0g
- Trans Fat: 0g
- Carbohydrates: 29g
- Fiber: 1g
- Protein: 1g
- Cholesterol: 0mg