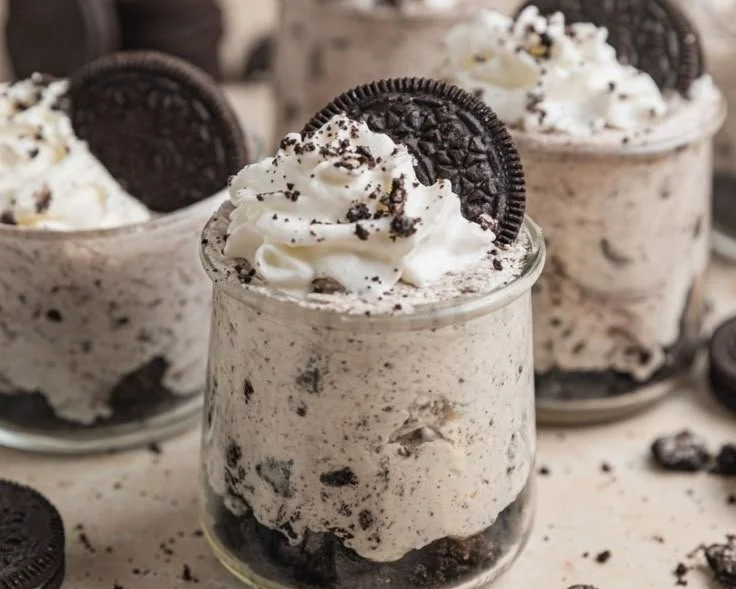
As summer days roll in and the heat starts to rise, I find myself craving something cool, sweet, and irresistibly delicious. Our family has always had a soft spot for dessert, especially when it involves that classic chocolate sandwich cookie: Oreos. It takes me back to my childhood, where after school, I would sneak into the pantry for a few cookies, savoring the creamy filling and the crunch of that chocolatey shell. Today, I’m excited to share a delightful creation that brings those delicious memories alive: Oreo No-Bake Cheesecake Cups. These indulgent treats are rich, creamy, and oh-so-easy to whip up, making them the perfect sweet ending to any summer meal.
Recipe Timing
- Prep Duration: 20 minutes
- Active Cooking: 10 minutes
- Total Duration: 1 hour and 20 minutes (including chilling time)
- Portion Size: Serves 6
- Complexity: Simple
Nutritional Recipe
- Calories per portion: Approximately 300
- Protein: 3 grams per serving
- Carbs: 33 grams per serving
- Fats: 18 grams per serving
- Fiber: 1 gram per serving
- Sugars: 17 grams per serving
- Sodium: 210 mg per serving
Why You’ll Love This Oreo No-Bake Cheesecake Cups
Not only are these cheesecake cups deliciously satisfying, but they’re also incredibly easy to make! There’s no baking involved, which means no worrying about oven temperatures or checking multiple times to see if your dessert is done. The combination of creamy cheesecake filling made with cream cheese and Cool Whip, along with the crunchy Oreo crust, creates an unforgettable dessert that’s perfect for any occasion—be it a summer barbecue, a birthday celebration, or just a sweet treat after dinner. Plus, they are customizable—the more Oreos, the better, right?
The Complete Cooking Journey
Making Oreo No-Bake Cheesecake Cups is as simple as it is delightful. From crushing the Oreos to creating the silky cheesecake filling and layering everything into beautiful cups, this recipe is a guaranteed crowd-pleaser. Let’s dive into the steps so you can treat yourself and your loved ones to a dreamy dessert!
Ingredients:
- 1 8 oz block of cream cheese, softened
- 1 8 oz. Cool Whip or whipped topping
- 2/3 c powdered sugar
- 1 tsp vanilla
- 24-26 Oreo cookies (more as desired)
Method:
Step 1: Crushing the Oreos
Start by placing the Oreos in a plastic bag and sealing it tightly. Using a rolling pin or a sturdy wooden spoon, crush the Oreos until they reach a fine crumb texture. This will serve as the irresistible crust for your cheesecake cups.
Step 2: Creating the Oreo Crust
Next, spoon 1 1/2 – 2 tablespoons of the crushed Oreos into the bottom of 6 small dessert dishes (make sure they can hold at least 3/4 cup to 1 cup of filling). Press down lightly to form a solid base and set them aside while you prepare the filling.
Step 3: Mixing the Creamy Filling
In a mixing bowl, use either a hand mixer or a standing mixer to whip the softened cream cheese and powdered sugar together until the mixture is creamy and smooth, resembling a silky frosting.
Step 4: Infusing Flavor
Add in the vanilla extract and beat it into the cream cheese mixture just until combined. This little splash of vanilla will elevate the flavor of your cheesecake to heavenly heights.
Step 5: Folding in the Cool Whip
Gently fold in the Cool Whip to your cream cheese mixture. Be careful not to overmix; you want to maintain that fluffy, light texture.
Step 6: Completing the Cheesecake Filling
Now it’s time to fold in the remaining crushed Oreos—this is where the magic happens! The crushed Oreos will add delightful chunks throughout the creamy filling, ensuring every bite is packed with flavor.
Step 7: Assembling the Cups
Divide the cheesecake filling evenly among the six dishes, gently pressing it down onto the crushed Oreos to create an even layer on the bottom.
Step 8: Chilling Before Serving
Chill the cheesecake cups for about 1 hour or until you’re ready to serve. This cooling time allows the flavors to meld beautifully and the structure to set.
Step 9: The Final Touch
Just before serving, top each cup with a swirl of whipped cream and a sprinkle of crushed Oreos for that perfect finishing touch. Enjoy every creamy, dreamy bite!
Serving Suggestions & Pairings
These Oreo No-Bake Cheesecake Cups shine on their own but can be perfectly paired with fresh berries, chocolate sauce, or a side of coffee for a delightful contrast. They make an excellent dessert for picnics, outdoor dining, or movie night at home. If you’re feeling extra indulgent, serve them with a scoop of vanilla ice cream on the side!
Storage & Leftovers Guide
Store any leftovers in an airtight container in the refrigerator for up to 3 days. However, these cheesecakes are usually so delicious that they don’t last long! If you want to prepare them ahead of time for a gathering, they can be made a day in advance—just be sure to add the toppings right before serving.
Kitchen Wisdom & Success Tips
- Make Sure the Cream Cheese is Softened: This step is critical to achieving a smooth filling. Just leave it out at room temperature for about 30 minutes before starting.
- Don’t Overmix the Cool Whip: Gently folding it in helps keep the filling light and airy.
- Crush Oreos Finely: The finer the crumbs, the better your crust will hold together. But don’t worry—some chunky bits add character!
- Use Plastic Wrap for Storage: If you need to cover the cups before serving, use plastic wrap to keep them fresh without disturbing the toppings.
- Double the Recipe for a Crowd: If you’re hosting a gathering, this recipe is easily doubled. Just make sure to have enough dessert cups on hand!
Flavor Variations & Adaptations
Feel free to customize these cheesecakes by mixing in your favorite flavors! Try adding a tablespoon of mint extract for a refreshing twist, or replace half of the cream cheese with peanut butter for a chocolate-peanut butter combo. You could also experiment with different cookies; golden Oreos or chocolate mint cookies make excellent substitutes!
Reader Questions & Solutions
-
Q: Can I use regular whipped cream instead of Cool Whip?
A: Yes, you can definitely use homemade whipped cream! Just make sure it’s very stiff so it holds the airiness of the filling. -
Q: What if I can’t find Oreos?
A: Any chocolate sandwich cookie will work well as a substitute. -
Q: Can I freeze these cheesecake cups?
A: Though they can be frozen, it’s best to save the toppings for before serving, as whipped cream doesn’t thaw very well. -
Q: How can I make this gluten-free?
A: Simply swap out the Oreos for gluten-free chocolate sandwich cookies, and you’re good to go! -
Q: Can I scale this recipe?
A: Absolutely! Just adjust the quantities accordingly, and maintain the ratio of cream cheese to Cool Whip.
Wrapping Up
Creating these Oreo No-Bake Cheesecake Cups is not just about making a dessert; it’s about sharing joy and memories with loved ones. Easy to prepare and delightful to eat, these cups are the perfect addition to any table. So, gather your ingredients, channel your inner chef, and enjoy crafting this sweet treat that’s sure to bring a smile. Happy baking (or should I say, no-baking)!
PrintOreo No-Bake Cheesecake Cups
Easy and indulgent Oreo No-Bake Cheesecake Cups, perfect for summer sweet cravings.
- Prep Time: 20 minutes
- Cook Time: 10 minutes
- Total Time: 80 minutes
- Yield: 6 servings 1x
- Category: Dessert
- Method: No-Bake
- Cuisine: American
- Diet: Vegetarian
Ingredients
- 1 8 oz block of cream cheese, softened
- 1 8 oz Cool Whip or whipped topping
- 2/3 cup powdered sugar
- 1 tsp vanilla extract
- 24–26 Oreo cookies (more as desired)
Instructions
- Crush the Oreos in a plastic bag using a rolling pin until fine crumbs form.
- Spoon 1 1/2 – 2 tablespoons of crushed Oreos into the bottom of 6 small dessert dishes and press down.
- Mix the softened cream cheese and powdered sugar until creamy using a hand or standing mixer.
- Add the vanilla extract and combine gently into the cream cheese mixture.
- Fold in the Cool Whip carefully to maintain a fluffy texture.
- Incorporate the remaining crushed Oreos, mixing for flavor distribution.
- Divide the cheesecake filling evenly among the dessert dishes, pressing down onto the crushed Oreos.
- Chill for about 1 hour before serving.
- Top with whipped cream and crushed Oreos before serving.
Notes
Can be made a day in advance. Store leftovers in an airtight container in the fridge for up to 3 days.
Nutrition
- Serving Size: 1 serving
- Calories: 300
- Sugar: 17g
- Sodium: 210mg
- Fat: 18g
- Saturated Fat: 10g
- Unsaturated Fat: 8g
- Trans Fat: 0g
- Carbohydrates: 33g
- Fiber: 1g
- Protein: 3g
- Cholesterol: 30mg