
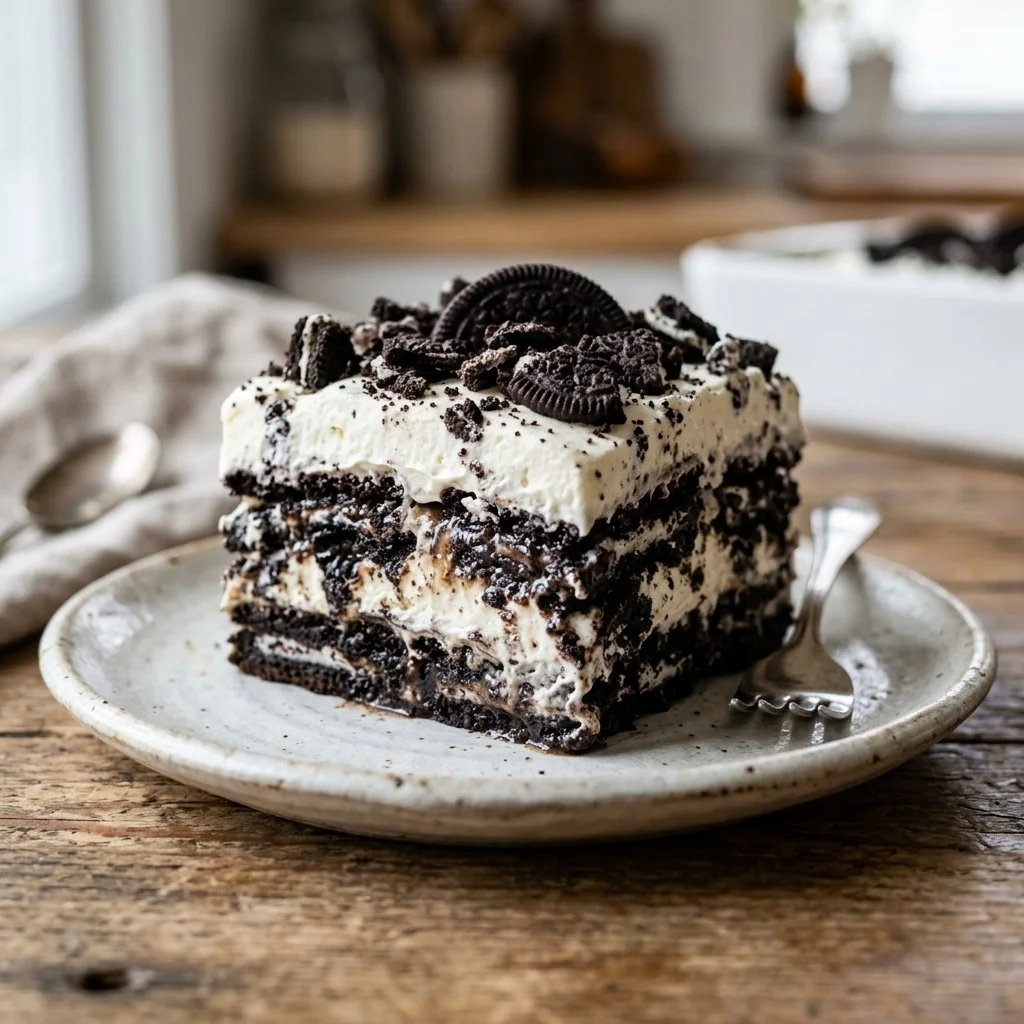
As a child, summer days meant running barefoot through the grass, the scent of sunscreen lingering in the air, and of course, sharing delicious treats with friends and family. One memory that stands out is my mom’s Oreo Icebox Cake—an effortless, no-bake dessert that somehow combined the rich, chocolatey crunch of Oreos with an impossibly smooth, creamy filling. Every spoonful took me back to sun-soaked afternoons where laughter mingled with the sweet taste of summer. Today, I’m excited to share this delightful recipe with you. Whether you’re celebrating a special occasion or just craving a simple indulgence, this Oreo Icebox Cake is sure to bring joy to your table.
Recipe Timing
- Prep Duration: 20 minutes
- Active Cooking: 20 minutes
- Total Duration: 4 hours (or overnight)
- Portion Size: Serves 8-10
- Complexity: Simple
Nutritional Recipe
- Calories per portion: Approximately 350
- Protein: 5g
- Carbs: 38g
- Fats: 22g
- Fiber: 1g
- Sugars: 20g
- Sodium: 150mg
Why You’ll Love This Oreo Icebox Cake
If you’ve dreamt of a dessert that’s both decadent and refreshingly simple, look no further! This Oreo Icebox Cake combines the best of both worlds—a rich cream cheese filling complemented by the iconic taste of Oreos. It’s incredibly easy to assemble, requiring minimal kitchen time while it does all the hard work of chilling in the fridge. The result? A luscious, chilled cake that’s perfect for any occasion. Plus, who doesn’t love a dessert that’s as easy to make as it is delicious?
The Complete Cooking Journey
With just a handful of ingredients, you can create an incredible dessert that’s bound to impress. Picture this: you pull the cake from the fridge, cut into a slice, and reveal layers of crunchy Oreo goodness juxtaposed with creamy bliss. It’s a triumph of texture and flavor that will have your guests coming back for seconds (and thirds!).
Ingredients:
- 1 package Oreo cookies
- 2 cups heavy whipping cream
- 1 cup powdered sugar
- 1 teaspoon vanilla extract
- 1 package (8 oz) cream cheese
- 1/4 cup milk
Method:
Step 1: Whip the Cream
In a mixing bowl, whip the heavy cream with powdered sugar and vanilla extract until stiff peaks form. This airy base is the heart of our dessert, giving it lightness and the perfect sweetness.
Step 2: Blend the Cream Cheese
In another bowl, beat the cream cheese and milk until smooth. This will create a rich and velvety filling that beautifully contrasts with the crunchy Oreos.
Step 3: Combine the Mixtures
Fold the whipped cream into the cream cheese mixture until well combined. Take your time here—this gentle folding will ensure your cake remains light and fluffy.
Step 4: Layer the Oreos
In a rectangular dish, begin layering the Oreo cookies and the cream mixture, starting with a layer of Oreos. The end result should feature beautiful layers of chocolatey cookies and creamy goodness.
Step 5: Continue Layering
Continue layering until all ingredients are used, finishing with the cream mixture on top. This will provide a beautiful presentation that highlights the Oreos.
Step 6: Refrigerate
Refrigerate for at least 4 hours or overnight. This step is crucial; it allows the flavors to meld together and the cookies to soften.
Step 7: Serve and Enjoy
Serve chilled and enjoy! Grab your spoons and delve into a slice of nostalgia, letting the creamy texture and cookie crunch take you back to those carefree summer days.
Serving Suggestions & Pairings
This dessert shines on its own, but for an elevated experience, serve it with a drizzle of chocolate sauce or a spoonful of fresh berries. A dollop of whipped cream on top never hurts either! Pair it with a tall glass of milk for a delightful nostalgic treat or enjoy it alongside a hot cup of coffee for a cozy after-dinner dessert.
Storage & Leftovers Guide
If you find yourself with leftovers (though I doubt that!), store them in an airtight container in the refrigerator. It will keep well for about 3-4 days. Just be aware that the cookies will continue to soften, creating a slightly different texture, which many people enjoy.
Kitchen Wisdom & Success Tips
- Stiff Peaks Matter: Make sure your whipped cream forms stiff peaks for that dreaminess in texture.
- Cream Cheese Tip: For easier blending, let your cream cheese sit at room temperature for a bit before mixing.
- Layering: Don’t rush the layering process; take your time to create beautiful layers and press down gently for a more compact cake.
Flavor Variations & Adaptations
Feel free to get creative! Swap out Oreos for other types of cookies like chocolate chip or peanut butter if you’re looking for an alternative flavor. For an even richer dessert, consider folding in some chocolate or peanut butter into the cream mixture.
Reader Questions & Solutions
-
Question: Can I use low-fat cream cheese?
- Answer: Yes, but be mindful it may alter the texture slightly, making it less rich.
-
Question: How long will this last in the fridge?
- Answer: It will be good for about 3-4 days, but it’s best enjoyed fresh.
-
Question: Can I freeze this cake?
- Answer: You can freeze it! Wrap it tightly and it will last up to 2 months. Thaw in the refrigerator before serving.
-
Question: What’s the best way to cut the cake?
- Answer: Use a sharp, warm knife! You can run it under hot water, dry it, and then cut—it helps slice through the layers beautifully.
-
Question: How can I make this gluten-free?
- Answer: Use gluten-free cookies for a delicious gluten-conscious dessert!
Wrapping Up
This Oreo Icebox Cake is more than just a dessert; it’s a connection to memories and a celebration of simple pleasures. As you make this delightful dish, remember to savor not just the end result but the joyful process of preparing it. I hope it brings you as much happiness as it did to my home. Dive into this recipe, share it with loved ones, and allow it to sweeten your days. Happy baking!
PrintOreo Icebox Cake

A delightful no-bake dessert combining the rich crunch of Oreos with a creamy filling, perfect for summer indulgence.
- Prep Time: 20 minutes
- Cook Time: 20 minutes
- Total Time: 240 minutes
- Yield: 8-10 servings 1x
- Category: Dessert
- Method: No-Bake
- Cuisine: American
- Diet: Vegetarian
Ingredients
- 1 package Oreo cookies
- 2 cups heavy whipping cream
- 1 cup powdered sugar
- 1 teaspoon vanilla extract
- 1 package (8 oz) cream cheese
- 1/4 cup milk
Instructions
- Whip the heavy cream with powdered sugar and vanilla extract until stiff peaks form.
- Blend the cream cheese and milk until smooth.
- Combine the whipped cream into the cream cheese mixture until well combined.
- Layer the Oreo cookies and cream mixture in a rectangular dish, starting with Oreos.
- Continue layering until all ingredients are used, finishing with the cream mixture on top.
- Refrigerate for at least 4 hours or overnight.
- Serve chilled and enjoy!
Notes
For an elevated experience, serve with chocolate sauce or fresh berries. Store leftovers in an airtight container for 3-4 days.
Nutrition
- Serving Size: 1 serving
- Calories: 350
- Sugar: 20g
- Sodium: 150mg
- Fat: 22g
- Saturated Fat: 12g
- Unsaturated Fat: 8g
- Trans Fat: 0g
- Carbohydrates: 38g
- Fiber: 1g
- Protein: 5g
- Cholesterol: 30mg