
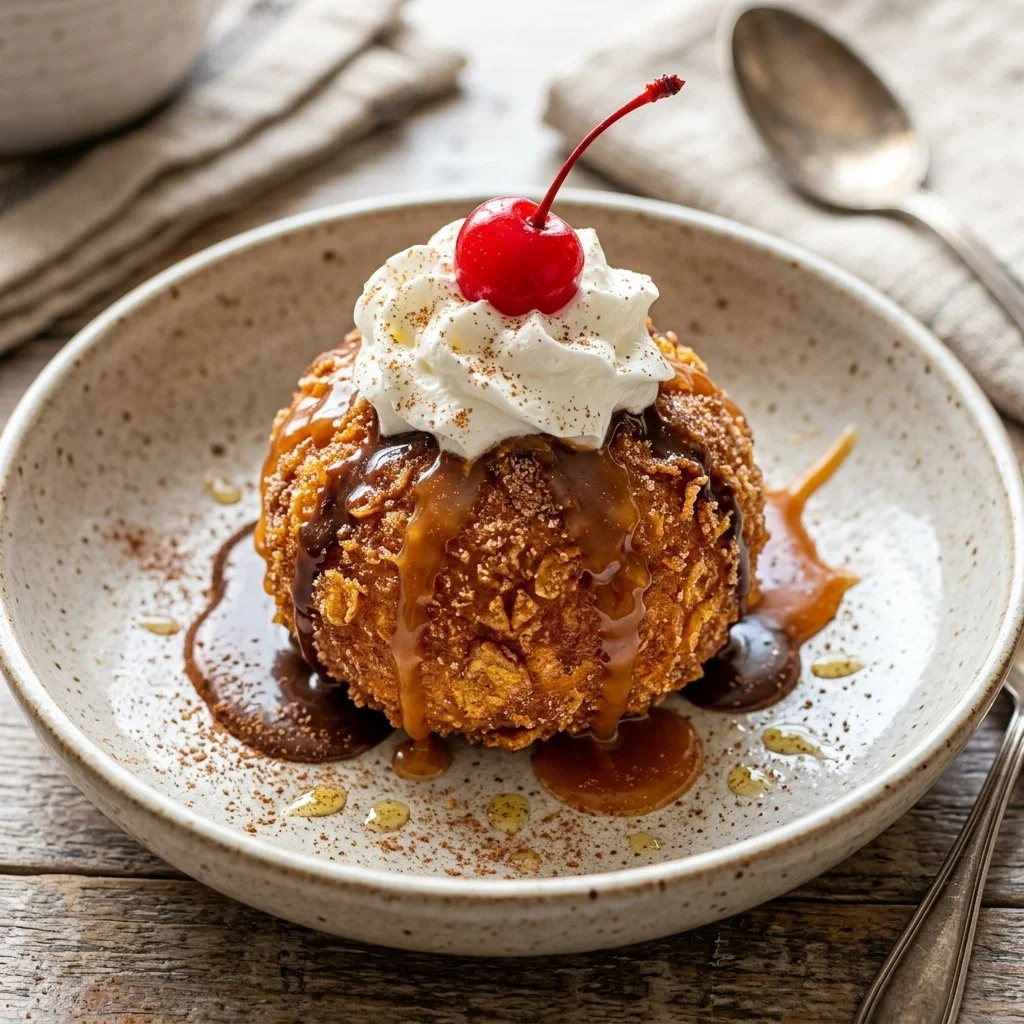
Every time summer rolls around, memories of lazy afternoons filled with ice cream and laughter come flooding back. There’s something undeniably nostalgic about ice cream—the way it melts into sweet, creamy bliss, cooling you in the heat of the day. As a child, I was always mesmerized by the magic of fried ice cream at our local Mexican restaurant. The juxtaposition of a crispy outer layer and the soft, cold ice cream inside was pure delight. It felt like a culinary miracle—how could something so cold and creamy be fried to golden perfection?
Today, I want to share with you how to recreate that whimsical experience right at home with this Mexican Fried Ice Cream recipe. It’s a dish that effortlessly combines the joy of ice cream with the surprise of a warm, crunchy exterior. Let’s dive into this delightful culinary adventure!
Recipe Timing
- Prep Duration: 20 minutes (not including freezing time)
- Active Cooking: 15 minutes
- Total Duration: 2 hours and 35 minutes (2 hours for freezing ice cream)
- Portion Size: Serves 4
- Complexity: Simple
Nutritional Recipe
- Calories per portion: Approximately 380
- Protein: 6 grams per serving
- Carbs: 51 grams per serving
- Fats: 18 grams per serving
- Fiber: 1 gram per serving
- Sugars: 28 grams per serving
- Sodium: 150 mg per serving
Why You’ll Love This Mexican Fried Ice Cream
This Mexican Fried Ice Cream isn’t just a dessert; it’s an experience that tickles your taste buds! Each bite brings together the velvety smoothness of vanilla ice cream with a crunch that’s reminiscent of your favorite cereal. The warm, caramel notes of the coconut and cinnamon mingling with the rich chocolate sauce make this an indulgent treat that’s perfect for any occasion, whether it’s a summer BBQ or a cozy family dinner. Plus, it’s a guaranteed conversation starter that will wow your friends and family!
The Complete Cooking Journey
From freezing those ice cream spheres to that triumphant moment when they slip into the hot oil, each step in crafting this dessert brings its own sort of joy. You’ll find that as you prepare your ingredients, the aromas of cinnamon and toasted coconut fill your kitchen, setting the stage for a fun cooking experience.
Ingredients:
- 1 quart vanilla ice cream
- 1 cup crushed cornflakes
- 1/2 cup shredded coconut
- 1/4 cup sugar
- 1 teaspoon ground cinnamon
- 1/2 cup all-purpose flour
- 1 egg
- 1/2 cup milk
- Vegetable oil for frying
- Chocolate sauce (for serving)
- Whipped cream (for serving)
Method:
Step 1: Scoop and Freeze the Ice Cream
Scoop the vanilla ice cream into balls and place them on a baking sheet. Freeze for at least 2 hours until solid.
Step 2: Prepare the Crunchy Coating
In a bowl, combine crushed cornflakes, coconut, sugar, and cinnamon. Mix well.
Step 3: Make the Batter
In another bowl, whisk together flour, egg, and milk until smooth.
Step 4: Heat the Oil
Heat vegetable oil in a deep pan to 350°F (175°C).
Step 5: Coat the Ice Cream Balls
Dip the frozen ice cream balls into the batter, then roll them in the cornflake mixture, coating well.
Step 6: Fry the Ice Cream
Carefully place the coated ice cream balls in the hot oil and fry until golden brown, about 10-15 seconds.
Step 7: Drain the Excess Oil
Remove and drain on paper towels.
Step 8: Serve and Savor
Serve immediately with chocolate sauce and whipped cream.
Serving Suggestions & Pairings
These delightful morsels are best served fresh from the fryer! Drizzle them with rich chocolate sauce and fluffy whipped cream to add a luxurious touch. Pair your Mexican Fried Ice Cream with fresh strawberries or a side of churros for a festive twist!
Storage & Leftovers Guide
While fried ice cream is best enjoyed fresh, you can prepare the ice cream balls and the coatings ahead of time and store them in the freezer. Just keep in mind that once fried, they lose their crunchy texture and should ideally be eaten right away. If you have leftovers, you might consider re-frying them quickly for a second chance at that crispiness!
Kitchen Wisdom & Success Tips
- Keep Everything Cold: Make sure your ice cream balls are fully frozen before frying; this ensures the ice cream doesn’t melt too quickly, resulting in a gooey mess.
- Monitor Oil Temperature: Use a thermometer to keep the frying oil at a consistent temperature for the best results.
- Experiment with Flavors: Try using different ice cream flavors to mix it up. Strawberry or chocolate ice cream can provide exciting new tastes!
Flavor Variations & Adaptations
Feel free to customize your flavors! Consider adding crushed nuts or different spices to your cornflake coating. A dash of nutmeg can add a warming touch, or using different types of chocolate sauce can offer new flavor experiences.
Reader Questions & Solutions
-
Can I make this recipe ahead of time?
Yes, you can prepare the ice cream balls and store them in the freezer. Just coat and fry them right before serving. -
What oil is best for frying?
Vegetable oil works well because of its high smoke point, but you could also use canola or peanut oil. -
How do I keep the ice cream from melting too fast during frying?
Ensure that the ice cream balls are very cold (frozen solid) before dipping them in batter and frying them quickly in hot oil. -
What can I do if my coatings don’t stick?
If the coating isn’t adhering, you could try rolling the ice cream in the cornflake mixture more firmly or ensuring the batter is thick enough. -
Can I use gluten-free flour for the batter?
Absolutely! Gluten-free flour blends should work just as well.
Wrapping Up
This Mexican Fried Ice Cream recipe is a celebration of contrasts—cold and warm, sweet and crunchy, all coming together to create a unique dessert experience. So, gather your ingredients, turn on your favorite tunes, and let the joy of cooking fill your kitchen as you create this delightful treat. You’ll be creating memories that, just like those lazy summer days, will linger long after the last bite. Happy cooking!
PrintMexican Fried Ice Cream
Experience the joy of ice cream with a crispy, warm exterior in this delightful Mexican Fried Ice Cream recipe.
- Prep Time: 20 minutes
- Cook Time: 15 minutes
- Total Time: 155 minutes
- Yield: 4 servings 1x
- Category: Dessert
- Method: Frying
- Cuisine: Mexican
- Diet: Vegetarian
Ingredients
- 1 quart vanilla ice cream
- 1 cup crushed cornflakes
- 1/2 cup shredded coconut
- 1/4 cup sugar
- 1 teaspoon ground cinnamon
- 1/2 cup all-purpose flour
- 1 egg
- 1/2 cup milk
- Vegetable oil for frying
- Chocolate sauce (for serving)
- Whipped cream (for serving)
Instructions
- Scoop and Freeze the Ice Cream: Scoop the vanilla ice cream into balls and place them on a baking sheet. Freeze for at least 2 hours until solid.
- Prepare the Crunchy Coating: In a bowl, combine crushed cornflakes, coconut, sugar, and cinnamon. Mix well.
- Make the Batter: In another bowl, whisk together flour, egg, and milk until smooth.
- Heat the Oil: Heat vegetable oil in a deep pan to 350°F (175°C).
- Coat the Ice Cream Balls: Dip the frozen ice cream balls into the batter, then roll them in the cornflake mixture, coating well.
- Fry the Ice Cream: Carefully place the coated ice cream balls in the hot oil and fry until golden brown, about 10-15 seconds.
- Drain the Excess Oil: Remove and drain on paper towels.
- Serve and Savor: Serve immediately with chocolate sauce and whipped cream.
Notes
Best enjoyed fresh. Prepare ice cream balls in advance and freeze.
Nutrition
- Serving Size: 1 serving
- Calories: 380
- Sugar: 28g
- Sodium: 150mg
- Fat: 18g
- Saturated Fat: 10g
- Unsaturated Fat: 8g
- Trans Fat: 0g
- Carbohydrates: 51g
- Fiber: 1g
- Protein: 6g
- Cholesterol: 50mg