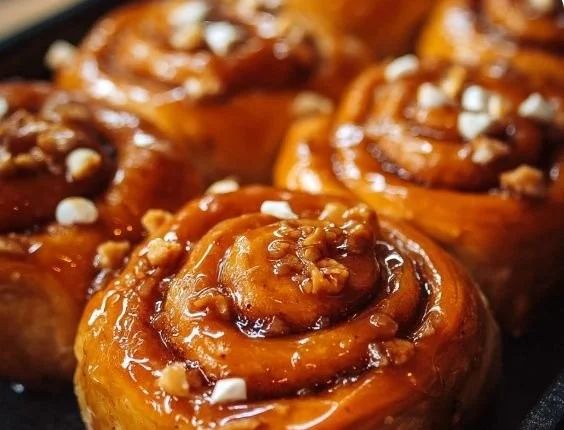
There’s something magical about the aroma of freshly baked goods that can transport you right back to your childhood kitchen. I remember those early Sunday mornings when my grandmother would whip up cinnamon rolls, the scent wafting through the house, beckoning us to gather around the table. Today, I’m bringing that same spirit into my kitchen with these Sweet and Sticky Homemade Honey Buns. They are soft, fluffy, and drenched in sticky honey goodness—perfect for breakfast or a cozy snack. Come along as we roll up our sleeves and create a treat that’ll warm your soul!
Recipe Timing
- Prep Duration: 15 minutes
- Active Cooking: 20 minutes
- Total Duration: 1 hour 15 minutes
- Portion Size: Serves 8
- Complexity: Simple
Nutritional Recipe
- Calories per portion: Approximately 210 calories
- Protein: 4 grams
- Carbs: 34 grams
- Fats: 8 grams
- Fiber: 1 gram
- Sugars: 10 grams
- Sodium: 170 mg
Why You’ll Love This Sweet and Sticky Homemade Honey Buns
These honey buns are a symphony of flavors and textures! With a golden crust that gives way to a soft, pillowy interior, the sweetness of honey combined with the richness of melted butter makes each bite a celebration. Whether you enjoy them for breakfast, brunch, or an afternoon pick-me-up, they are sure to bring joy to your day. And the best part? They’re easy to make, allowing you to indulge in homemade comfort without spending a whole day in the kitchen.
The Complete Cooking Journey
Gather your ingredients and let’s embark on a cooking journey together. With just a handful of pantry staples, we will create delightful honey buns that will envelop your home in irresistible aromas. Follow this step-by-step guide, and soon you’ll be enjoying the warm, gooey goodness of these delightful treats.
Ingredients:
- 2 cups all-purpose flour (plus extra for dusting)
- 1/2 cup milk (warm) (Make sure the milk is at a warm temperature to activate the yeast)
- 1/4 cup honey (plus extra for drizzling)
- 1/4 cup unsalted butter (melted) (Substitutions: use olive oil or margarine if out of butter)
- 1/4 cup sugar
- 1 packet instant yeast (2 1/4 tsp)
- 1/4 tsp salt
- 1 large egg
Method:
Step 1: Warm the Milk
Start by warming your milk to a comfortable temperature—not too hot, just warm enough to activate the yeast. That’s about 110°F, the perfect cozy blanket for your yeast!
Step 2: Combine Ingredients
In a large mixing bowl, combine the warm milk, honey, melted butter, and sugar. Give it a gentle whisk until smooth and all the sugar is dissolved.
Step 3: Add Yeast
Sprinkle the instant yeast over the mixture. Allow it to sit for about 5-10 minutes. You’ll know it’s ready when it becomes frothy—this means the yeast is active!
Step 4: Mix the Egg
Once the yeast is bubbly, it’s time to whisk in the egg, blending it evenly into the mixture.
Step 5: Gradually Add Flour
Begin adding your all-purpose flour, one cup at a time, mixing as you go. This is where that extra flour for dusting comes into play, so keep it handy.
Step 6: Knead the Dough
Once you can no longer stir, switch to kneading your dough—flour your work surface and knead until the dough is smooth and elastic. This should take about 5-7 minutes.
Step 7: Let the Dough Rise
Place your dough in a lightly greased bowl, cover with a clean kitchen towel, and let it rise in a warm place until it doubles in size—around 30 minutes.
Step 8: Shape the Honey Buns
After the dough has risen, punch it down to release the air. Roll it out on a floured surface, forming it into a rectangle. Cut it into strips and roll each strip into a bun.
Step 9: Prepare for Baking
Arrange the honey buns in a greased baking dish, ensuring they’re close together. Cover again and let them rise for another 15-20 minutes.
Step 10: Preheat the Oven
While the buns are rising, preheat your oven to 350°F (175°C), allowing it to get nice and hot for baking.
Step 11: Bake to Perfection
Bake your buns for 20-25 minutes or until they are golden brown and have risen beautifully.
Step 12: Drizzle with Honey
Once baked, remove them from the oven and drizzle with extra honey while they’re still warm for that beautiful sticky finish.
Step 13: Cool and Serve
Allow your honey buns to cool slightly before serving. Enjoy them warm, or at room temperature!
Serving Suggestions & Pairings
These honey buns pair wonderfully with a hot cup of tea or coffee. Serve them as a delightful breakfast treat, or enjoy them as an afternoon snack with a spread of cream cheese or butter. They can also make an unforgettable addition to holiday brunches or gatherings!
Storage & Leftovers Guide
Leftover honey buns can be stored in an airtight container at room temperature for up to 3 days. For longer storage, wrap them tightly in plastic wrap and freeze. They’ll last up to 2 months in the freezer. Just reheat them in the oven for a few minutes before serving!
Kitchen Wisdom & Success Tips
- Make sure your ingredients are at room temperature for best results.
- Feel free to adjust the sweetness by adding more or less honey in the dough or toppings.
- Keep an eye on the baking time, as ovens can vary; you want them golden, not overly brown.
Flavor Variations & Adaptations
For a twist, add cinnamon to the dough, or try pressing in some chopped nuts or chocolate pieces before rolling them up. You can even experiment with different glazes like maple syrup or a lemon icing for extra flavor.
Reader Questions & Solutions
-
Can I use regular yeast instead of instant yeast?
Yes, but you will need to activate it in warm milk first for about 5-10 minutes before adding it to the mixture. -
What if my dough doesn’t rise?
Check the freshness of your yeast. If it’s expired, it won’t activate. Also, ensure your rising environment is warm and draft-free. -
Can I make these ahead of time?
Absolutely! Prepare the dough, shape the buns, and then refrigerate overnight. Let them rise before baking the next morning. -
What if I don’t have honey?
You can substitute with maple syrup or agave nectar for a similar sweetness. -
How can I make these gluten-free?
Use a gluten-free flour blend that includes xanthan gum for the best texture!
Wrapping Up
Making Sweet and Sticky Homemade Honey Buns will not only fill your kitchen with inviting scents but also fill your heart with joy. Remember, cooking is not just about the end result, but the journey you take to get there. So put on your apron, gather your loved ones, and let’s bake up some delightful memories together! Happy cooking!
PrintSweet and Sticky Homemade Honey Buns
These soft and fluffy honey buns are drenched in sticky honey goodness, perfect for breakfast or a cozy snack.
- Prep Time: 15 minutes
- Cook Time: 20 minutes
- Total Time: 75 minutes
- Yield: 8 servings 1x
- Category: Breakfast
- Method: Baking
- Cuisine: American
- Diet: Vegetarian
Ingredients
- 2 cups all-purpose flour (plus extra for dusting)
- 1/2 cup warm milk
- 1/4 cup honey (plus extra for drizzling)
- 1/4 cup unsalted butter (melted)
- 1/4 cup sugar
- 1 packet instant yeast (2 1/4 tsp)
- 1/4 tsp salt
- 1 large egg
Instructions
- Warm the milk to 110°F to activate the yeast.
- Combine the warm milk, honey, melted butter, and sugar in a mixing bowl.
- Sprinkle the instant yeast over the mixture and let it sit for 5-10 minutes until frothy.
- Whisk in the egg until blended.
- Gradually add flour, mixing as you go.
- Knead the dough for 5-7 minutes until smooth and elastic.
- Place in a greased bowl, cover, and let it rise for about 30 minutes.
- Punch down, roll into a rectangle, cut into strips and shape into buns.
- Arrange the honey buns in a greased dish and let rise for another 15-20 minutes.
- Preheat the oven to 350°F (175°C).
- Bake for 20-25 minutes until golden brown.
- Drizzle with extra honey while warm.
- Cool slightly before serving.
Notes
Leftover honey buns can be stored at room temperature for up to 3 days or frozen for up to 2 months. Reheat in the oven before serving.
Nutrition
- Serving Size: 1 bun
- Calories: 210
- Sugar: 10g
- Sodium: 170mg
- Fat: 8g
- Saturated Fat: 4g
- Unsaturated Fat: 2g
- Trans Fat: 0g
- Carbohydrates: 34g
- Fiber: 1g
- Protein: 4g
- Cholesterol: 30mg