
There’s something incredibly special about a homemade dessert that can instantly take you back to your childhood. For many of us, indulging in a creamy, luscious cheesecake topped with familiar chocolatey goodness evokes memories of family gatherings, birthday celebrations, and cozy evenings spent with loved ones. And when it comes to that mouthwatering combination of cream cheese and Oreos, well, it’s hard to resist. This Oreo cheesecake recipe is a delightful tribute to simpler times, where every bite is a reminder of joyous moments shared around the dinner table.
Recipe Timing
- Prep Duration: 20 minutes
- Active Cooking: 1 hour
- Total Duration: 4 hours (plus chilling time)
- Portion Size: Serves 10-12
- Complexity: Simple
Nutritional Recipe
- Calories per portion: Approximately 290
- Protein: 5g
- Carbs: 28g
- Fats: 18g
- Fiber: 1g
- Sugars: 14g
- Sodium: 300mg
Why You’ll Love This Oreo Cheesecake Recipe
This Oreo cheesecake is not just a dessert; it’s an experience. The cookie crust is incredibly easy to make and gives that wonderful crunch that contrasts perfectly with the creamy filling. Each slice is rich, decadent, and bursting with the unmistakable flavor of Oreos, making it a hit at any gathering. Plus, it’s a no-fuss recipe that even novice bakers can deliver with confidence. Just imagine presenting this stunning cheesecake at your next get-together or cozy family dinner, watching as everyone digs in with delight.
The Complete Cooking Journey
Now, let’s embark on this delicious journey where simple ingredients come together to create a masterpiece. Each step is designed to bring you closer to that moment of indulgence, and I promise you, the result is well worth it!
Ingredients:
- 24 Oreo cookies, crushed
- 1/2 cup unsalted butter, melted
- 2 cups cream cheese, softened
- 1 cup powdered sugar
- 1 teaspoon vanilla extract
- 1 cup whipped cream
- Additional Oreo cookies for topping
Method:
Step 1: Preheat Your Oven
First things first, let’s get that oven to the perfect baking temperature. Preheat your oven to 325°F (160°C) so that it’s ready when we are.
Step 2: Make the Crust
In a mixing bowl, combine the crushed Oreo cookies with melted butter. Mix until it resembles wet sand, then press this mixture firmly into the bottom of a springform pan to create the crust. Think of it as building the solid foundation for your cheesecake!
Step 3: Cream the Cheese
In a separate large bowl, beat together the softened cream cheese, powdered sugar, and vanilla extract. Beating until smooth is key; we want a lovely creamy base that will hold all our delicious flavors.
Step 4: Fold in the Love
Now it’s time to bring in the whipped cream! Gently fold it into the cream cheese mixture. This step is crucial for adding lightness to your cheesecake, so take your time and fold until just combined.
Step 5: Pour and Smooth
Pour the glorious cream cheese mixture over your prepared crust. Smooth the top with a spatula for an evenly beautiful surface—this will make your cheesecake extra Instagram-worthy!
Step 6: Bake to Perfection
Slide the cheesecake into your preheated oven and bake for 55-60 minutes. You’ll know it’s ready when the center is set but still has a slight jiggle to it. It’s all about finding that perfect balance!
Step 7: Cool Down
Once baking is done, turn off the oven and let your cheesecake cool inside for about an hour. This gentle cooling helps prevent cracks on the surface.
Step 8: Chill Out
Refrigerate your cheesecake for at least 4 hours, but overnight is even better! This chilling time allows the flavors to meld beautifully and gives it that firm texture we all love.
Step 9: Garnish and Serve
Before serving, don’t forget the finishing touch: top your cheesecake with additional Oreo cookies for that extra flair. Cut into slices and watch the smiles spread around the room!
Serving Suggestions & Pairings
This Oreo cheesecake pairs wonderfully with a dollop of fresh whipped cream, a drizzle of chocolate sauce, or seasonal berries for a burst of color and flavor. It’s perfect for celebrations, potlucks, or simply a weeknight treat after a long day. You could even serve it with a cup of hot coffee for a delightful contrast to the sweet creaminess.
Storage & Leftovers Guide
Leftover cheesecake? Yes, please! Store any uneaten slices in an airtight container in the refrigerator for up to 5 days. If you want to keep it longer, consider freezing individual slices wrapped tightly in plastic wrap, which will last for about 2 months. Just let them thaw in the fridge before serving!
Kitchen Wisdom & Success Tips
Here are a few expert tips to help you nail this recipe:
- Make sure your cream cheese is at room temperature for easy blending.
- For a deeper chocolate flavor, you can add some cocoa powder to the cream cheese mixture.
- If you prefer a firmer texture, bake it a little longer, but keep an eye on it to avoid overcooking.
Flavor Variations & Adaptations
Feeling adventurous? Try mixing it up with different flavors! Add some peanut butter to the cream cheese for a twist, or switch out the Oreos for a different type of cookie like chocolate chip or mint. The possibilities are endless!
Reader Questions & Solutions
-
Why did my cheesecake crack during baking?
- Cheesecakes sometimes crack if they bake too fast or get too hot. Make sure your oven temperature is accurate and consider lowering it slightly next time.
-
Can I use low-fat cream cheese?
- Yes! Low-fat cream cheese can be used, but be aware it may alter the texture slightly.
-
How do I know when my cheesecake is done?
- It’s done when it appears set around the edges but slightly jiggly in the center. It will continue to firm up as it cools.
-
What if I don’t have a springform pan?
- You can use a regular cake pan, but you’ll need to line it well with parchment paper so it can be removed easily.
-
Can I make this cheesecake ahead of time?
- Absolutely! It’s perfect for making a day or two ahead of your planned event. Just keep it chilled in the fridge.
Wrapping Up
Creating this Oreo cheesecake is not just about following a recipe; it’s about creating moments of bliss in your kitchen that you can share with others. So roll up your sleeves, gather your ingredients, and dive into this delicious journey. I promise you’ll cherish every bite and every memory created around the table. Happy baking!
PrintOreo Cheesecake
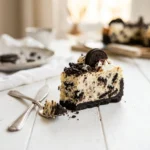
A creamy, rich Oreo cheesecake that brings joy with every bite.
- Prep Time: 20 minutes
- Cook Time: 60 minutes
- Total Time: 240 minutes
- Yield: 10-12 servings 1x
- Category: Dessert
- Method: Baking
- Cuisine: American
- Diet: Vegetarian
Ingredients
- 24 Oreo cookies, crushed
- 1/2 cup unsalted butter, melted
- 2 cups cream cheese, softened
- 1 cup powdered sugar
- 1 teaspoon vanilla extract
- 1 cup whipped cream
- Additional Oreo cookies for topping
Instructions
- Preheat your oven to 325°F (160°C).
- In a mixing bowl, combine the crushed Oreo cookies with melted butter.
- Beat together the cream cheese, powdered sugar, and vanilla until smooth.
- Fold in the whipped cream until just combined.
- Pour the cream cheese mixture over the crust and smooth the top.
- Slide the cheesecake into the oven and bake for 55-60 minutes.
- Turn off the oven and let the cheesecake cool inside for an hour.
- Refrigerate the cheesecake for at least 4 hours, preferably overnight.
- Top with additional Oreo cookies before serving.
Notes
Make sure cream cheese is at room temperature for best blending. You can add cocoa powder for a deeper chocolate flavor.
Nutrition
- Serving Size: 1 slice
- Calories: 290
- Sugar: 14g
- Sodium: 300mg
- Fat: 18g
- Saturated Fat: 9g
- Unsaturated Fat: 6g
- Trans Fat: 0g
- Carbohydrates: 28g
- Fiber: 1g
- Protein: 5g
- Cholesterol: 30mg