There’s something utterly magical about a no-bake cheesecake, don’t you think? The way it glides across your fork, the creamy texture that dances with every bite… it’s summer on a plate. Growing up, my grandma had a sensational knack for desserts, and her no-bake cheesecake was always the star of the show. I can still remember the whispers of excitement that filled the air as she pulled that springform pan from the fridge, its cool exterior hinting at the delight that awaited us. Today, I want to share with you not just a recipe, but a piece of that joyful nostalgia wrapped in an easy, delicious dessert that requires no oven—perfect for any occasion!
Recipe Timing
- Prep Duration: 15 minutes
- Active Cooking: 15 minutes
- Total Duration: 4 hours and 15 minutes (including refrigeration)
- Portion Size: 8 servings
- Complexity: Simple
Nutritional Recipe
- Calories per portion: 350
- Protein: 5g
- Carbs: 30g
- Fats: 25g
- Fiber: 1g
- Sugars: 15g
- Sodium: 180mg
Why You’ll Love This No Bake Cheesecake
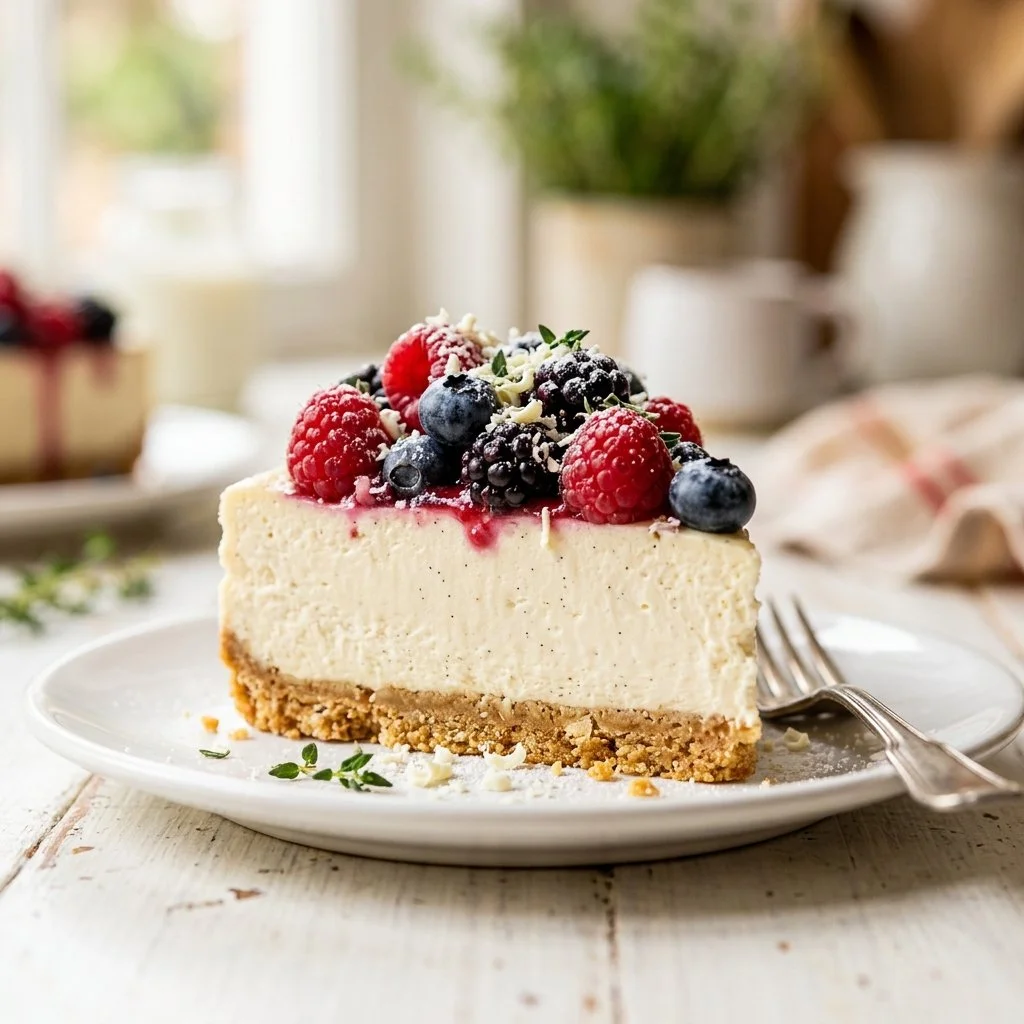
This no-bake cheesecake strikes a beautiful balance of rich and light. It’s the kind of dessert that you can whip up with minimal effort, yet it feels celebratory. Perfect for warm evenings, it’s as satisfying as it is beautiful, dressed in your favorite toppings like colorful fruits or decadent chocolate. The crust is buttery and crispy, the filling is velvety-smooth, and the best part? You don’t have to turn on your oven!
The Complete Cooking Journey
Let’s embark on this culinary adventure together! From the satisfying crunch of the crust to the airy creaminess of the filling, every step brings us closer to a dessert that’s perfect for any gathering—or a cozy night in.
Ingredients:
- 1 1/2 cups graham cracker crumbs
- 1/2 cup unsalted butter, melted
- 2 cups cream cheese, softened
- 1 cup powdered sugar
- 1 teaspoon vanilla extract
- 1 cup heavy whipping cream
- Optional toppings (fruit, chocolate, etc.)
Method:
Step 1: Prepare the Graham Cracker Crust
In a bowl, mix graham cracker crumbs with melted butter until well combined. Press the mixture into the bottom of a 9-inch springform pan to form the crust.
Step 2: Blend the Creamy Filling
In another bowl, beat the cream cheese with powdered sugar and vanilla extract until smooth.
Step 3: Whip the Cream
In a separate bowl, whip the heavy cream until stiff peaks form. Gently fold the whipped cream into the cream cheese mixture until no streaks remain.
Step 4: Combine and Smooth
Pour the cream cheese mixture over the crust in the springform pan and smooth the top.
Step 5: Chill and Set
Refrigerate for at least 4 hours or until set.
Step 6: Serve and Enjoy
Serve chilled, topped with your choice of fruit or chocolate if desired.
Serving Suggestions & Pairings
This cheesecake is utterly delightful on its own, but it shines even brighter when paired with fresh strawberries, blueberries, or a drizzle of chocolate ganache. Consider serving it alongside a cup of freshly brewed coffee or a glass of sweet iced tea for a delightful afternoon treat.
Storage & Leftovers Guide
Leftovers? You’re in luck! This cheesecake stores well in the refrigerator for up to 5 days. Just be sure to cover it well with plastic wrap or foil to maintain its freshness. For longer storage, you can freeze individual slices for up to a month—just let them thaw in the fridge overnight before enjoying!
Kitchen Wisdom & Success Tips
- Soften Your Cream Cheese: Make sure your cream cheese is at room temperature for easy blending. This will ensure a smooth filling without lumps.
- Whip to Stiff Peaks: When whipping your cream, watch closely for stiff peaks—a crucial step for achieving that fluffy texture!
- Garnish Creatively: Get playful with toppings! Think nuts, caramel, or crushed cookies for added texture and flavor.
- Springform Secrets: Ensure your springform pan is tightly sealed. A little leakage can be a hassle, but lining the base with parchment paper can help.
Flavor Variations & Adaptations
Feeling adventurous? Consider incorporating flavors like lemon zest for a citrus twist, or swapping vanilla for almond extract for a unique profile. For chocolate lovers, melt dark chocolate into your filling for an indulgent chocolate cheesecake. You can also experiment with different crusts, like Oreos or gingersnap cookies!
Reader Questions & Solutions
-
Q: Can I use low-fat cream cheese?
A: Yes! Low-fat cream cheese can work, but expect a slightly different texture and richness. -
Q: What if my whipped cream doesn’t thicken?
A: Make sure your heavy cream is cold, and your bowl is also chilled. If it stays thin, you may need a bit more time or ensure it hasn’t been overwhipped. -
Q: How do I prevent cracks in my cheesecake?
A: Chilling slowly in the refrigerator helps. If serving over a few days, cover tightly to prevent drying the surface. -
Q: Can I make this dairy-free?
A: Absolutely! Use dairy-free cream cheese and coconut cream in place of heavy cream for a delicious alternative! -
Q: What’s the best way to slice the cheesecake?
A: Warm a knife under hot water and wipe it clean between cuts. This gives you clean slices and an appealing look.
Wrapping Up
So there you have it—an easy, no-bake cheesecake that’s practically begging to be made! Each bite is a moment to savor, whether you’re sharing it with loved ones or indulging solo. I can’t wait for you to create your own memories around this delightful dessert. Now, get in the kitchen, have fun, and let that cheesecake chill; you’re in for a treat!
PrintNo-Bake Cheesecake
A delightful and creamy no-bake cheesecake that’s perfect for warm evenings and special occasions.
- Prep Time: 15 minutes
- Cook Time: 15 minutes
- Total Time: 255 minutes
- Yield: 8 servings 1x
- Category: Dessert
- Method: No-Bake
- Cuisine: American
- Diet: Vegetarian
Ingredients
- 1 1/2 cups graham cracker crumbs
- 1/2 cup unsalted butter, melted
- 2 cups cream cheese, softened
- 1 cup powdered sugar
- 1 teaspoon vanilla extract
- 1 cup heavy whipping cream
- Optional toppings (fruit, chocolate, etc.)
Instructions
- Prepare the Graham Cracker Crust: In a bowl, mix graham cracker crumbs with melted butter until well combined. Press the mixture into the bottom of a 9-inch springform pan to form the crust.
- Blend the Creamy Filling: In another bowl, beat the cream cheese with powdered sugar and vanilla extract until smooth.
- Whip the Cream: In a separate bowl, whip the heavy cream until stiff peaks form. Gently fold the whipped cream into the cream cheese mixture until no streaks remain.
- Combine and Smooth: Pour the cream cheese mixture over the crust in the springform pan and smooth the top.
- Chill and Set: Refrigerate for at least 4 hours or until set.
- Serve and Enjoy: Serve chilled, topped with your choice of fruit or chocolate if desired.
Notes
Soften the cream cheese for easy blending and consider using creative toppings like nuts or caramel.
Nutrition
- Serving Size: 1 slice
- Calories: 350
- Sugar: 15g
- Sodium: 180mg
- Fat: 25g
- Saturated Fat: 15g
- Unsaturated Fat: 10g
- Trans Fat: 0g
- Carbohydrates: 30g
- Fiber: 1g
- Protein: 5g
- Cholesterol: 70mg