
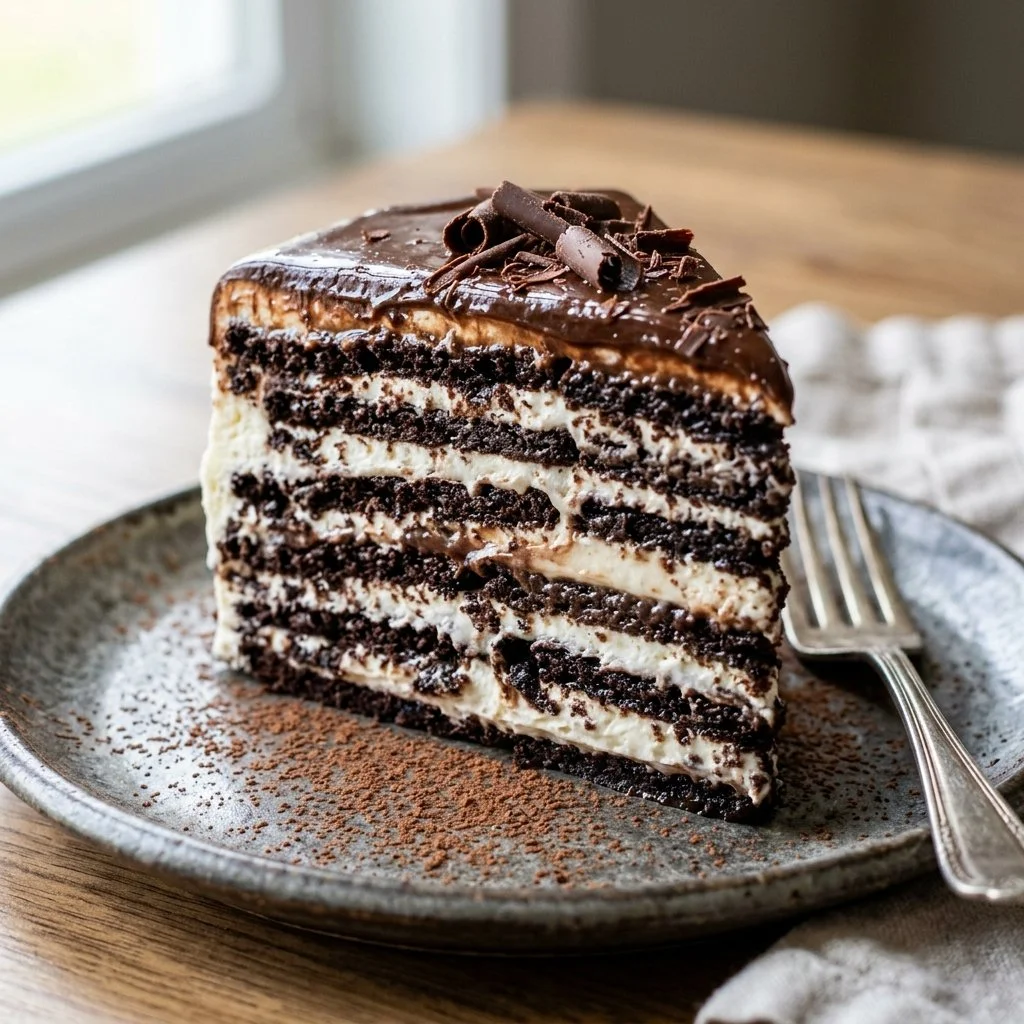
There’s something magical about desserts that remind us of our childhood—sweet, easy, and filled with memories. For me, one of those cherished treats is Icebox Cake. I remember the excitement that swirled in the air when my grandma would pull out her secret weapon for summer gatherings. With just a few simple ingredients, she’d create a luscious dessert that felt indulgent yet was surprisingly easy to whip up. The best part? It didn’t even require turning on the oven!
Now, as I share this recipe with you, I hope to pass along that feeling of joy and nostalgia. This Icebox Cake is perfect for any occasion—bringing friends together for a summer picnic or sweetening up a cozy weeknight dinner. Loaded with layers of creamy whipped goodness, crunchy chocolate wafers, and the fresh brightness of ripe strawberries, it’s a dessert that will make any moment feel like a celebration. So, let’s dive into the delightful world of Icebox Cake!
Recipe Timing
- Prep Duration: 20 minutes
- Active Cooking: 0 minutes (no cooking required!)
- Total Duration: 4 hours (minimum) or overnight
- Portion Size: Serves 8
- Complexity: Simple
Nutritional Recipe
- Calories per portion: Approximately 300
- Protein: 2 grams
- Carbs: 30 grams
- Fats: 20 grams
- Fiber: 1 gram
- Sugars: 14 grams
- Sodium: 50 mg
Why You’ll Love This Icebox Cake
This Icebox Cake combines crispy, chocolatey goodness with a light, fluffy texture that melts in your mouth. The layers of whipped cream and fruit create an irresistible contrast, while the refrigerator does all the work of melding the flavors together beautifully. It’s a versatile dessert, too—feel free to swap out the strawberries for bananas, peaches, or even crushed cookies for a unique twist. Plus, it’s a no-bake dessert, making it a perfect choice for hot summer days when you want something sweet without the heat.
The Complete Cooking Journey
-
Whipping Up the Cream
We start by bringing together the heavy cream, powdered sugar, and vanilla. This magical blend transforms into fluffy waves of happiness that will serve as the backbone of our cake. -
Layering the Love
Next, it’s time to assemble! Layer the chocolate wafer cookies with whipped cream and fruit, repeating until you’ve got a mountain of deliciousness. -
Chilling to Perfection
Once assembled, it’s all about patience. Cover that masterpiece and let the refrigerator work its magic. The longer it sits, the better the flavors meld! -
Serving Your Creation
Finally, slice into your creation and watch the delight in your friends’ faces as they taste a slice of summer on their plates.
Ingredients:
- 2 cups heavy cream
- 1/2 cup powdered sugar
- 1 teaspoon vanilla extract
- 1 package chocolate wafer cookies
- 1 cup strawberries, sliced (or any preferred fruit)
Method:
Step 1: Whip the Cream
In a large bowl, whip the heavy cream with powdered sugar and vanilla until stiff peaks form. This will create a wonderfully airy base for your cake.
Step 2: Layer the Cookies
On a serving platter, arrange a layer of chocolate wafer cookies. This will form the sturdy base of your delicious tower.
Step 3: Spread the Cream
Spread a generous layer of whipped cream over the cookies, then add a layer of sliced strawberries. This combination of textures is simply divine!
Step 4: Build Your Layers
Repeat the layering process until all ingredients are used up, finishing off with a lavish layer of whipped cream on top. Feel free to get creative with your layers!
Step 5: Chill to Perfection
Cover with plastic wrap and refrigerate for at least 4 hours or overnight. This step is essential for the flavors to meld into a cohesive dessert.
Step 6: Serve and Enjoy
Slice and serve chilled to your eager guests. Trust me, their smiles will be worth it!
Serving Suggestions & Pairings
This Icebox Cake pairs beautifully with a cup of freshly brewed coffee or a scoop of vanilla ice cream. For an extra touch, drizzle some chocolate sauce over the top when serving, or sprinkle with finely chopped nuts for added texture.
Storage & Leftovers Guide
Leftovers can be stored in the refrigerator, covered in plastic wrap, for up to 3 days. However, this dessert is best enjoyed fresh in the first couple of days to maintain its texture.
Kitchen Wisdom & Success Tips
- Be sure to use heavy cream for the best whipping results; lighter creams won’t whip up as well.
- For a fun twist, consider adding a layer of crushed cookies or other fruits like blueberries or raspberries in between the layers.
- Letting the cake sit overnight in the fridge will enhance the flavors and make slicing easier.
Flavor Variations & Adaptations
Feel free to swap out the chocolate wafer cookies for graham crackers for a s’mores-inspired cake. You can also add layers of lemon curd or different fruits to create more playful versions of this fabulous dessert.
Reader Questions & Solutions
- Can I use a different type of fruit? Absolutely! Any berry or sliced stone fruit works great here.
- What if I want to make this gluten-free? Use gluten-free wafer cookies to easily adapt this recipe.
- Can I make it in advance? Yes! This cakes stores well in the fridge for several days. Just wait to add any garnishes until right before serving.
- How do I know if my whipped cream is ready? The cream should hold stiff peaks—when you lift the whisk, it should stand up straight without flopping over.
- Can I substitute the heavy cream? For a lighter option, you can use whipped topping, but the flavor and texture will differ.
Wrapping Up
Icebox Cake isn’t just a dessert; it’s a sweet reminder of the moments we cherish with friends and family. It’s simple, delightful, and adaptable, making it the perfect centerpiece for any gathering. I hope you enjoy making this dessert as much as I do; remember, cooking is about creating joy in the kitchen! So gather your loved ones, dive into this delicious recipe, and let’s celebrate life, one slice at a time. Happy cooking!
PrintIcebox Cake
A nostalgic dessert that combines layers of creamy whipped goodness, crunchy chocolate wafers, and fresh strawberries, all without needing to turn on the oven.
- Prep Time: 20 minutes
- Cook Time: 0 minutes
- Total Time: 240 minutes
- Yield: 8 servings 1x
- Category: Dessert
- Method: No-Bake
- Cuisine: American
- Diet: Vegetarian
Ingredients
- 2 cups heavy cream
- 1/2 cup powdered sugar
- 1 teaspoon vanilla extract
- 1 package chocolate wafer cookies
- 1 cup strawberries, sliced (or any preferred fruit)
Instructions
- Whip the cream in a large bowl with powdered sugar and vanilla until stiff peaks form.
- Layer the chocolate wafer cookies on a serving platter.
- Spread a generous layer of whipped cream over the cookies, then add a layer of sliced strawberries.
- Repeat the layering process until all ingredients are used, finishing with whipped cream on top.
- Chill the cake for at least 4 hours or overnight in the refrigerator.
- Slice and serve chilled to your guests.
Notes
Leftovers can be stored in the refrigerator for up to 3 days, but it’s best enjoyed fresh.
Nutrition
- Serving Size: 1 serving
- Calories: 300
- Sugar: 14g
- Sodium: 50mg
- Fat: 20g
- Saturated Fat: 12g
- Unsaturated Fat: 8g
- Trans Fat: 0g
- Carbohydrates: 30g
- Fiber: 1g
- Protein: 2g
- Cholesterol: 70mg