
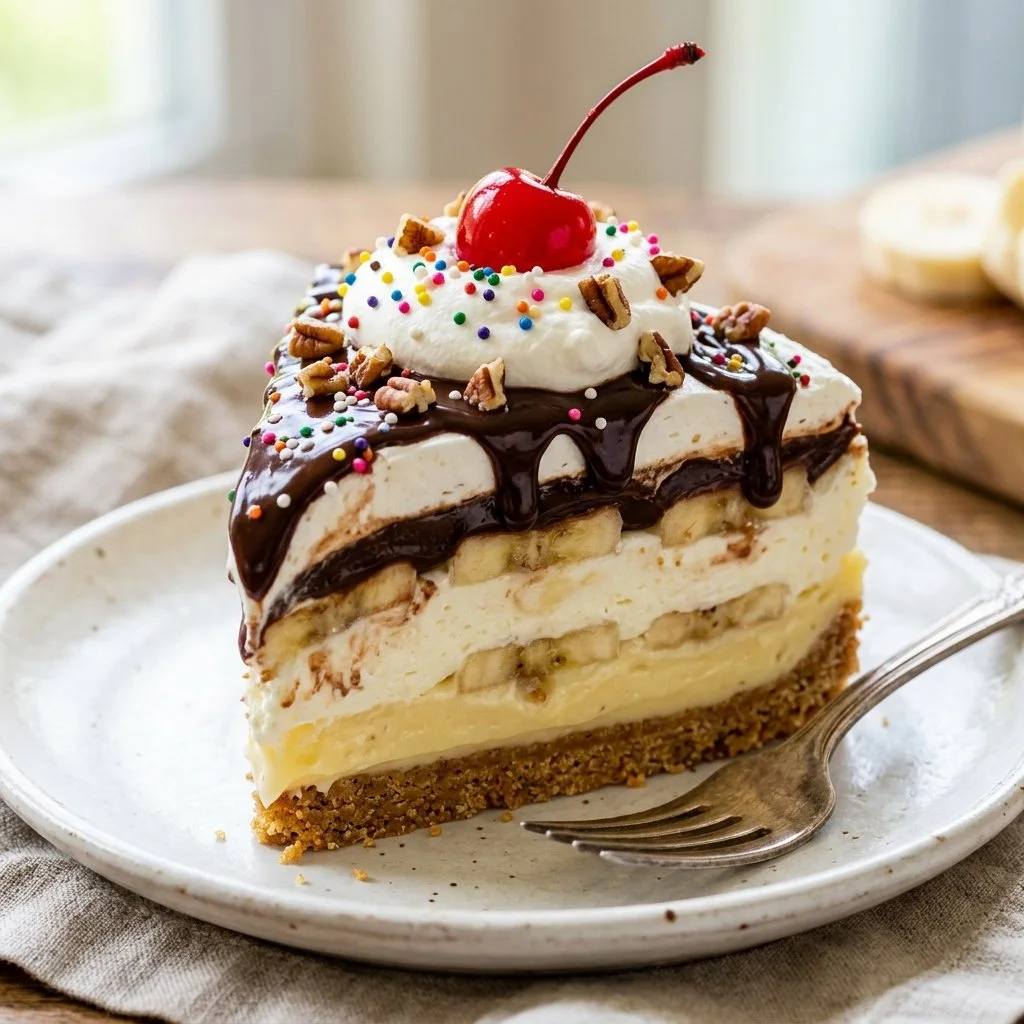
There’s something incredibly nostalgic about desserts that bring together the best of summer and childhood innocence. For me, it’s not just about the taste, but the memories wrapped up in each bite. I remember the summertime gatherings at my grandparents’ home, where the air was filled with laughter, the sun played its golden rays, and dessert was a common highlight. That’s when I first tasted the incredible No-Bake Banana Split Cake. It was a dessert that didn’t just please the palate but also painted smiles on everyone’s faces. As I recreate this masterpiece in my kitchen, it feels like a warm hug from my past, filled with ripe bananas, refreshing strawberries, and the irresistible charm of chocolate syrup. Join me as we embark on this delightful journey to make your very own No-Bake Banana Split Cake!
Recipe Timing
- Prep Duration: 20 minutes
- Active Cooking: 20 minutes
- Total Duration: 4 hours 20 minutes (including chilling)
- Portion Size: Serves 12
- Complexity: Simple
Nutritional Recipe
- Calories per portion: Approx. 230 calories
- Protein: 2 grams
- Carbs: 29 grams
- Fats: 12 grams
- Fiber: 1 gram
- Sugars: 12 grams
- Sodium: 210 mg
Why You’ll Love This No-Bake Banana Split Cake
This No-Bake Banana Split Cake is not just any dessert; it’s a celebration of flavors and textures that complement each other perfectly. The buttery graham cracker crust serves as a wonderful foundation, offering a slight crunch that harmonizes with the smoothness of the cream cheese layer. Add to that, the sweet and tangy burst from the pineapple and strawberries, and slices of ripe bananas that effortlessly melt in your mouth. And yes, we can’t forget the indulgent chocolate syrup that transforms this dessert into a showstopper. It’s perfect for any occasion or just as a splendid treat for yourself to enjoy after a long day.
The Complete Cooking Journey
Creating this No-Bake Banana Split Cake is not only straightforward but also incredibly rewarding. Follow along as I guide you step-by-step to create something that will wow your family and friends!
Ingredients:
- 2 ripe bananas
- 1 cup crushed graham crackers
- 1/2 cup unsalted butter, melted
- 1 cup powdered sugar
- 8 oz cream cheese, softened
- 2 cups whipped topping
- 1 cup sliced strawberries
- 1 cup crushed pineapple, drained
- 1/2 cup chocolate syrup
- 1/4 cup chopped nuts (optional)
Method:
Step 1: Prepare the Graham Cracker Crust
In a mixing bowl, combine the crushed graham crackers and melted butter. Press the mixture firmly into the bottom of a 9×13 inch dish to form a sturdy and tasty crust.
Step 2: Create the Cream Cheese Mixture
In a separate bowl, beat the softened cream cheese and powdered sugar together until smooth. Gently fold in the whipped topping to create a creamy, luscious mixture.
Step 3: Spread the Cream Cheese Base
Spread half of the cream cheese mixture evenly over the crust. This layer is crucial for holding all that fruity goodness!
Step 4: Add the Banana and Pineapple Layers
Now, layer the banana slices and the drained crushed pineapple on top of the cream cheese mixture. These fruity additions add a refreshing twist!
Step 5: Top with More Cream Cheese Mixture
Add the remaining cream cheese mixture, smoothing it out to cover the fruits, making sure everything is well-incorporated.
Step 6: Garnish with Strawberries and Syrup
Top your cake with a colorful array of sliced strawberries and then drizzle the chocolate syrup generously over the top. Just like that, your cake is not only delicious but also visually stunning!
Step 7: Optional Nutty Finish
For an extra crunch, sprinkle the chopped nuts on top if desired. These will add a beautiful texture contrast.
Step 8: Chill Before Serving
Chill in the refrigerator for at least 4 hours before serving. This step is essential to allow the flavors to meld beautifully!
Serving Suggestions & Pairings
Serve this No-Bake Banana Split Cake chilled, alongside a scoop of vanilla ice cream or topped with a dollop of whipped cream. It’s perfect for summer barbecues, potluck gatherings, or simply as a refreshing dessert after a family meal. Pair it with iced tea or a light sparkling beverage to elevate the experience even further!
Storage & Leftovers Guide
If you have leftovers (which is rare!), store them in an airtight container in the refrigerator. They will keep well for about 3 days. However, I suggest enjoying it fresh to savor every layer of flavor at its best!
Kitchen Wisdom & Success Tips
- Choose Ripe Bananas: The riper the bananas, the sweeter and more flavorful they are!
- Don’t Rush the Chilling: Patience is key; allowing the cake to set ensures each layer melds together beautifully.
- Graham Cracker Substitute: If you’re out of graham crackers, crushed vanilla wafers work just as well for the crust.
Flavor Variations & Adaptations
Feel free to customize your No-Bake Banana Split Cake! You can add layers of chopped peaches, blueberries, or even a drizzle of caramel sauce for a different flavor twist. For a lighter version, swap out the cream cheese mixture with Greek yogurt.
Reader Questions & Solutions
-
Q: Can I use a different fruit?
A: Absolutely! Feel free to experiment with other fruits like peaches or raspberries! -
Q: Can I make it gluten-free?
A: Yes! Use gluten-free graham crackers or a nut-based crust as a delicious alternative. -
Q: How far in advance can I make it?
A: You can make it a day ahead and let it chill overnight for the best results. -
Q: What can I do if I don’t like cream cheese?
A: Substitute with mascarpone cheese or a dairy-free cream cheese alternative for a different flavor profile. -
Q: Can I freeze this cake?
A: Yes, you can freeze individual slices! Just wrap them well and consume within a month for best taste.
Wrapping Up
As you prepare this No-Bake Banana Split Cake, remember it’s more than just a dessert; it’s a canvas for your creativity and love for cooking. Let every layer sing your unique flavor song and every bite take you back to those carefree summer evenings. I hope you find as much joy in making and sharing this cake as I do. Happy baking, friends, and may your kitchen be filled with sweetness!
PrintNo-Bake Banana Split Cake
A deliciously nostalgic dessert combining ripe bananas, refreshing strawberries, and a creamy cheese filling, all topped with chocolate syrup.
- Prep Time: 20 minutes
- Cook Time: 20 minutes
- Total Time: 260 minutes
- Yield: 12 servings 1x
- Category: Dessert
- Method: No-Bake
- Cuisine: American
- Diet: Vegetarian
Ingredients
- 2 ripe bananas
- 1 cup crushed graham crackers
- 1/2 cup unsalted butter, melted
- 1 cup powdered sugar
- 8 oz cream cheese, softened
- 2 cups whipped topping
- 1 cup sliced strawberries
- 1 cup crushed pineapple, drained
- 1/2 cup chocolate syrup
- 1/4 cup chopped nuts (optional)
Instructions
- Prepare the Graham Cracker Crust: In a mixing bowl, combine the crushed graham crackers and melted butter. Press the mixture firmly into the bottom of a 9×13 inch dish to form a sturdy and tasty crust.
- Create the Cream Cheese Mixture: In a separate bowl, beat the softened cream cheese and powdered sugar together until smooth. Gently fold in the whipped topping to create a creamy, luscious mixture.
- Spread the Cream Cheese Base: Spread half of the cream cheese mixture evenly over the crust. This layer is crucial for holding all that fruity goodness!
- Add the Banana and Pineapple Layers: Now, layer the banana slices and the drained crushed pineapple on top of the cream cheese mixture. These fruity additions add a refreshing twist!
- Top with More Cream Cheese Mixture: Add the remaining cream cheese mixture, smoothing it out to cover the fruits, making sure everything is well-incorporated.
- Garnish with Strawberries and Syrup: Top your cake with a colorful array of sliced strawberries and then drizzle the chocolate syrup generously over the top. Just like that, your cake is not only delicious but also visually stunning!
- Optional Nutty Finish: For an extra crunch, sprinkle the chopped nuts on top if desired. These will add a beautiful texture contrast.
- Chill Before Serving: Chill in the refrigerator for at least 4 hours before serving. This step is essential to allow the flavors to meld beautifully!
Notes
Serve chilled, alongside vanilla ice cream or a dollop of whipped cream. Ideal for summer gatherings.
Nutrition
- Serving Size: 1 serving
- Calories: 230
- Sugar: 12g
- Sodium: 210mg
- Fat: 12g
- Saturated Fat: 7g
- Unsaturated Fat: 5g
- Trans Fat: 0g
- Carbohydrates: 29g
- Fiber: 1g
- Protein: 2g
- Cholesterol: 30mg