
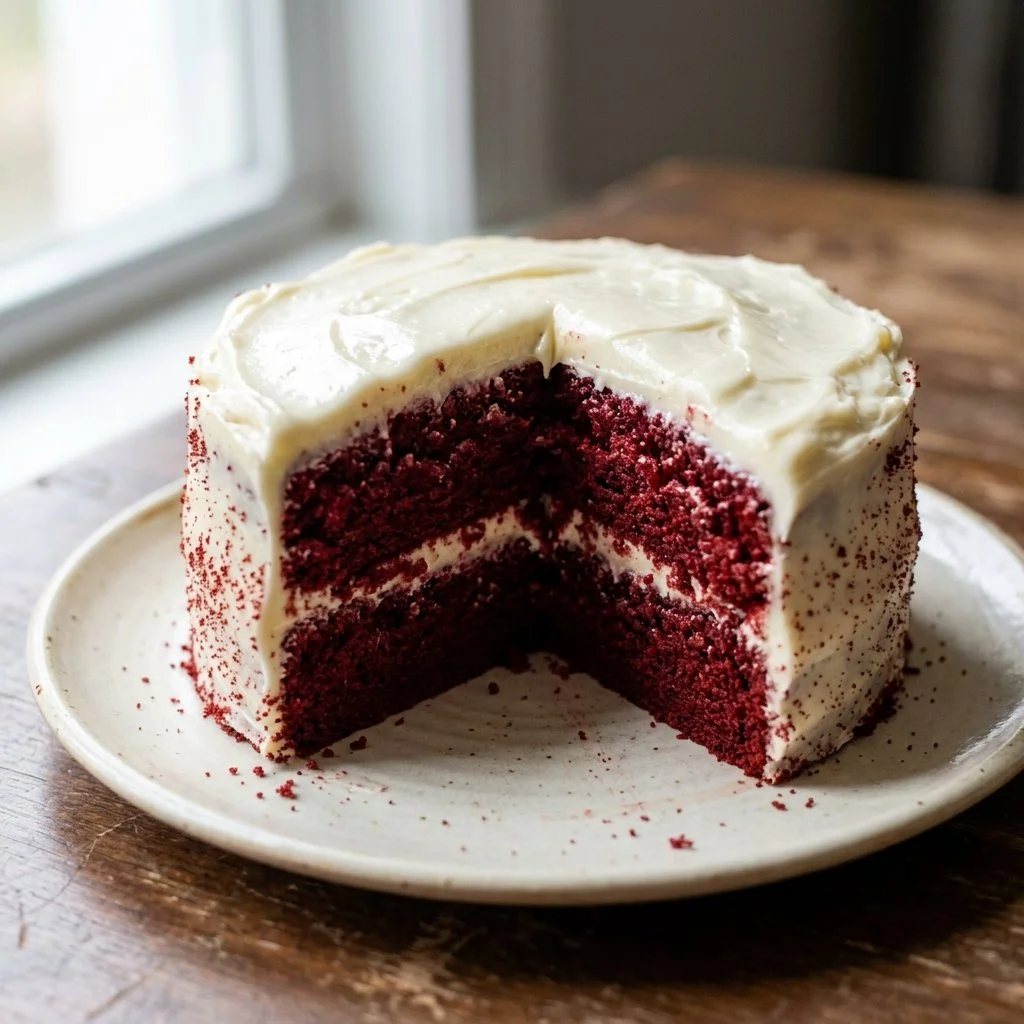
There’s something undeniably magical about red velvet cake. It’s not just the stunning vibrant color that calls to you; it’s the rich, velvety texture and the sweet, tangy flavor that truly makes your taste buds dance. As a child, I remember sneaking bites of my grandmother’s red velvet cake every time I visited her. The moment I’d walk into her kitchen and catch a whiff of that unmistakable aroma, I felt like the luckiest kid in the world. Little did I know, those moments would inspire my own baking adventures years later.
Fast forward to now, and every time I whip up a red velvet cake, I can’t help but smile, reminiscing about those cherished family gatherings. Today, I want to share with you my favorite red velvet cake recipe—one that’s delightfully easy to follow and certain to impress anyone lucky enough to get a slice. Let’s bake something splendid together!
Recipe Timing
- Prep Duration: 15 minutes
- Active Cooking: 30 minutes
- Total Duration: 1 hour
- Portion Size: Serves 12
- Complexity: Simple
Nutritional Recipe
- Calories per portion: Approx. 400
- Protein: 4g per serving
- Carbs: 56g per serving
- Fats: 20g per serving
- Fiber: 1g per serving
- Sugars: 32g per serving
- Sodium: 250mg per serving
Why You’ll Love This Red Velvet Cake
This red velvet cake is a celebration on its own! The tender, moist layers, coupled with the tangy cream cheese frosting, create an irresistible combination that brings joy in every bite. Plus, it’s a showstopper for any occasion, whether it’s a birthday, anniversary, or simply a cozy gathering with friends. The vibrant color will turn heads, and the flavor will keep everyone coming back for more.
The Complete Cooking Journey
Baking this red velvet cake is not just about following the steps; it’s an experience filled with delightful aromas and sweet anticipation. You’ll start by bringing together the simple ingredients, blending them into a gorgeous batter, and watching as they transform into two beautiful cake layers. Then, after a little cooling time, you’ll smother those cakes in a luxurious cream cheese frosting that makes the entire creation absolutely irresistible.
Ingredients:
- 2 1/2 cups all-purpose flour
- 1 1/2 cups granulated sugar
- 1 teaspoon baking soda
- 1 teaspoon salt
- 1 teaspoon cocoa powder
- 1 1/2 cups vegetable oil
- 1 cup buttermilk, room temperature
- 2 large eggs, room temperature
- 2 tablespoons red food coloring
- 1 teaspoon vanilla extract
- 1 teaspoon white vinegar
Method:
Step 1: Preheat the Oven
Preheat your oven to 350°F (175°C). While the oven warms up, grease and flour two 9-inch round cake pans to ensure your layers slide right out after baking.
Step 2: Sift the Dry Ingredients
In a medium bowl, sift together the flour, baking soda, salt, and cocoa powder. Sifting helps combine these dry ingredients evenly for a lighter cake!
Step 3: Combine Sugar and Oil
In a large mixing bowl, whisk together the sugar and vegetable oil until well combined. This is where the magic starts—sweetening up your cake with that rich oiliness!
Step 4: Add the Wet Ingredients
Stir in the buttermilk, eggs, red food coloring, vanilla extract, and white vinegar. Mix until everything is beautifully blended into a luscious mixture.
Step 5: Combine the Mixtures
Gradually add the dry ingredients to the wet ingredients, mixing until just combined. Be careful not to over-mix. You want your cake to remain tender and lovely!
Step 6: Divide and Bake
Divide the batter evenly between the prepared pans. Smooth out the tops with a spatula and then place into the oven. Bake for 25-30 minutes or until a toothpick inserted in the center comes out clean.
Step 7: Cooling Time
Once baked, let the cakes cool in the pans for 10 minutes. After that, carefully transfer them to wire racks to cool completely. This step is crucial—no one wants a melted frosting disaster!
Step 8: Frosting Delight
Once the cakes have completely cooled, it’s time to frost them with your favorite cream cheese frosting. Be generous—every bite should be a mix of cake and frosting goodness!
Serving Suggestions & Pairings
This red velvet cake pairs wonderfully with a cup of coffee or a glass of cold milk. For a festive touch, you can serve it alongside fresh berries or a scoop of vanilla ice cream. Imagine a slice of rich cake with a dollop of ice cream melting right in—it’s pure bliss!
Storage & Leftovers Guide
Store any leftover cake in an airtight container at room temperature for up to three days. If you want to keep it longer, refrigerate for up to a week, but I doubt there’ll be much left! For longer storage, you can freeze slices for up to three months—just ensure they’re wrapped well.
Kitchen Wisdom & Success Tips
To ensure your red velvet cake turns out flawless:
- Ensure all your ingredients are at room temperature for optimal mixing and rising.
- Don’t skip the vinegar; it’s key to that classic red velvet taste!
- Use high-quality cocoa powder for deeper flavor.
- Always check for doneness with a toothpick—oven times may vary.
Flavor Variations & Adaptations
Want to mix things up? Consider adding a hint of espresso powder for a mocha red velvet cake or some orange zest for a fun citrus twist. You could even experiment with different frostings—try a chocolate ganache or a light whipped cream for something refreshing.
Reader Questions & Solutions
-
Why did my cake turn out dry?
- Overbaking can lead to dryness. Make sure to check your cake a few minutes before the time is up!
-
Can I use cake flour instead of all-purpose?
- Yes! Cake flour can make your cake fluffier. Just adjust the amount you use slightly—use about a cup less.
-
What if I don’t have buttermilk?
- No worries! To make a substitute, add 1 tablespoon of lemon juice or vinegar to 1 cup of milk. Let it sit for a few minutes before using.
-
How can I achieve a richer red color?
- Using gel food coloring often provides a more vivid hue than liquid varieties. Adjust the amount until you reach your desired color.
-
Can I make this cake ahead of time?
- Absolutely! You can bake the layers a day in advance; just wrap them tightly and store in the fridge or at room temperature until you’re ready to frost.
Wrapping Up
Baking a red velvet cake is all about creating memories along with deliciousness. So, roll up your sleeves, gather your ingredients, and let’s craft something beautiful together! Whether it’s for a special occasion or simply to enjoy at home, this cake is one that will bring joy to your table. Happy baking!
PrintRed Velvet Cake
A classic red velvet cake with rich, velvety texture and tangy cream cheese frosting, perfect for any occasion.
- Prep Time: 15 minutes
- Cook Time: 30 minutes
- Total Time: 45 minutes
- Yield: 12 servings 1x
- Category: Dessert
- Method: Baking
- Cuisine: American
- Diet: Vegetarian
Ingredients
- 2 1/2 cups all-purpose flour
- 1 1/2 cups granulated sugar
- 1 teaspoon baking soda
- 1 teaspoon salt
- 1 teaspoon cocoa powder
- 1 1/2 cups vegetable oil
- 1 cup buttermilk, room temperature
- 2 large eggs, room temperature
- 2 tablespoons red food coloring
- 1 teaspoon vanilla extract
- 1 teaspoon white vinegar
Instructions
- Preheat your oven to 350°F (175°C) and grease two 9-inch round cake pans.
- Sift together the flour, baking soda, salt, and cocoa powder in a medium bowl.
- Whisk together the sugar and vegetable oil in a large mixing bowl until combined.
- Stir in the buttermilk, eggs, red food coloring, vanilla extract, and white vinegar until blended.
- Gradually add the dry ingredients to the wet ingredients, mixing until just combined.
- Divide the batter evenly between the prepared pans and smooth the tops.
- Bake for 25-30 minutes or until a toothpick inserted in the center comes out clean.
- Let the cakes cool in the pans for 10 minutes, then transfer to wire racks to cool completely.
- Frost with cream cheese frosting once cooled.
Notes
Use room temperature ingredients for best results. You can also substitute all-purpose flour with cake flour for a fluffier texture.
Nutrition
- Serving Size: 1 slice
- Calories: 400
- Sugar: 32g
- Sodium: 250mg
- Fat: 20g
- Saturated Fat: 5g
- Unsaturated Fat: 10g
- Trans Fat: 0g
- Carbohydrates: 56g
- Fiber: 1g
- Protein: 4g
- Cholesterol: 30mg