There’s something utterly magical about a chocolate cake that transforms an ordinary day into a moment worth celebrating. For me, the aroma of the Decadent Double Layer Chocolate Fudge Cake baking in the oven instantly conjures memories of joyous childhood parties, where laughter mingled with the sweet scent of chocolate. As a young girl, I would eagerly await the moment when we would dive into a rich slice, its moist texture and chocolatey goodness melting effortlessly in our mouths. It wasn’t just a cake; it was a centerpiece, a reason to gather, to share stories and create memories.
As I embarked on the journey to recreate this nostalgic delight, I realized how much of that joy comes from not just the end product, but the entire cooking process itself. This cake is a labor of love, and trust me, it’s worth every minute you’ll spend in the kitchen. So, let’s roll up our sleeves and dive into this delicious adventure together!
Recipe Timing
- Prep Duration: 20 minutes
- Active Cooking: 35-40 minutes
- Total Duration: 1 hour 10 minutes
- Portion Size: Serves 8-10
- Complexity: Moderate
Nutritional Recipe
- Calories per portion: Approximately 400
- Protein: 5g per serving
- Carbs: 56g per serving
- Fats: 20g per serving
- Fiber: 2g per serving
- Sugars: 31g per serving
- Sodium: 350mg per serving
Why You’ll Love This Decadent Double Layer Chocolate Fudge Cake
This cake isn’t just any dessert; it’s a symphony of flavors and textures. The rich chocolate fudge layers provide an intense chocolate flavor that satisfies even the most fervent chocoholics. The fluffy whipped cream frosting adds a lightness that perfectly contrasts with the dense cake, making each bite a heavenly experience. Whether you’re celebrating a special occasion or simply indulging in a treat for yourself, this cake brings warmth and joy to every moment.
The Complete Cooking Journey
Creating the Decadent Double Layer Chocolate Fudge Cake is not just about mixing ingredients; it’s about embracing the process and enjoying the delightful surprises along the way. From measuring the ingredients to watching the cake rise beautifully in the oven, every step is filled with anticipation.
Ingredients:
- 1.75 cups all-purpose flour
- 1.75 cups granulated sugar
- 0.75 cups unsweetened cocoa powder
- 1.5 teaspoons baking powder
- 1.5 teaspoons baking soda
- 1 teaspoon salt
- 2 large eggs
- 1 cup whole milk
- 0.5 cups vegetable oil
- 2 teaspoons vanilla extract
- 1 cup boiling water
- 1 cup semi-sweet chocolate chips
- 1 cup heavy cream (for frosting)
- 2 cups powdered sugar (for frosting)
- 2 teaspoons vanilla extract (for frosting)
- 1 serving chocolate shavings (for garnish)
Method:
Step 1: Preheat the Oven
Begin by preheating your oven to 350°F (175°C). Prepare two 9-inch round cake pans by greasing them with butter or cooking spray, and then dusting them lightly with flour to prevent sticking.
Step 2: Mix Dry Ingredients
In a large mixing bowl, sift together the all-purpose flour, granulated sugar, cocoa powder, baking powder, baking soda, and salt. Ensure these ingredients are well combined for a uniform batter.
Step 3: Combine Wet Ingredients
Make a well in the center of the dry mixture. Add in the large eggs, whole milk, vegetable oil, and vanilla extract. Using a hand mixer or stand mixer, beat the mixture on medium speed for about 2 minutes until it is fully combined and smooth.
Step 4: Add Boiling Water
Carefully stir in the boiling water. The batter will be quite thin, but that’s what gives the cake its moist texture. Gently fold in the semi-sweet chocolate chips until just combined.
Step 5: Bake the Cakes
Divide the batter evenly between the two prepared cake pans. Place them in the preheated oven and bake for 30-35 minutes, or until a toothpick inserted into the center of each cake comes out clean.
Step 6: Cool the Cakes
Once baked, remove the cakes from the oven and allow them to cool in the pans for about 10 minutes. Carefully turn the cakes out onto wire racks to cool completely.
Step 7: Prepare the Frosting
In a medium bowl, use an electric mixer to whip the heavy cream until soft peaks form. Gradually incorporate the powdered sugar and 2 teaspoons of vanilla extract, continuing to mix until the frosting reaches a smooth and fluffy consistency.
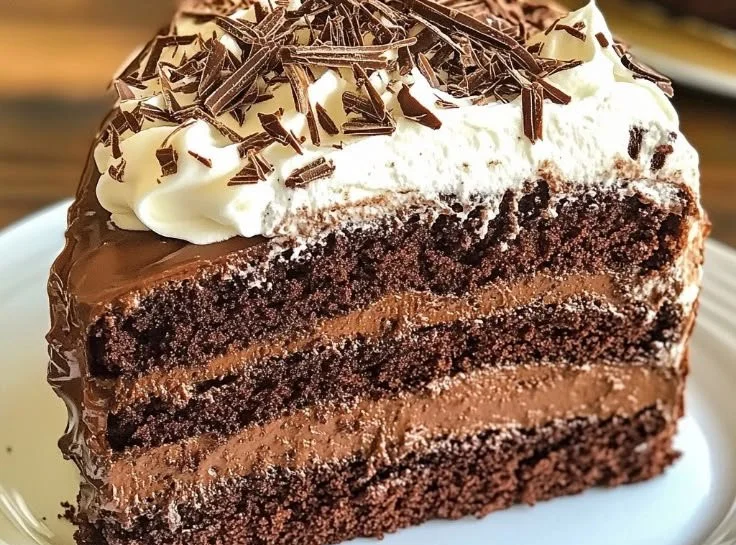
Step 8: Assemble the Cake
On a serving plate, place one layer of chocolate cake. Generously spread a layer of whipped frosting over the top. Carefully position the second cake layer on top and then frost the top and sides of the cake with the remaining frosting.
Step 9: Garnish
Use a vegetable peeler to create chocolate shavings from a bar of semi-sweet chocolate. Sprinkle the shavings over the top of the frosted cake for a decorative finish.
Step 10: Serve
Slice the cake into generous portions and serve. Each bite is sure to be a delightful experience of rich chocolate flavor!
Serving Suggestions & Pairings
For a truly decadent experience, consider pairing this cake with a scoop of vanilla ice cream or a dollop of freshly whipped cream. A side of fresh raspberries or strawberries adds a lovely tartness that beautifully complements the sweetness of the cake. For an after-dinner delight, serve it with a cup of rich coffee or a dessert wine.
Storage & Leftovers Guide
If you have any leftovers (which is rare with this cake!), keep it in an airtight container in the refrigerator for up to 4 days. You can also freeze slices for up to 2 months; just wrap them tightly in plastic wrap and aluminum foil before freezing.
Kitchen Wisdom & Success Tips
- Ensure all your ingredients are at room temperature before starting – this helps create an even and fluffy batter.
- Don’t be alarmed by the thin batter; this is what makes the cake moist!
- Use high-quality cocoa powder and chocolate chips for richer flavor.
- For easy clean-up, line your cake pans with parchment paper before greasing.
Flavor Variations & Adaptations
Feel free to explore other flavors! Add a teaspoon of espresso powder to intensify the chocolate flavor. You can also incorporate mint extract for a refreshing twist or layer in your favorite fruit preserves for added sweetness.
Reader Questions & Solutions
-
Can I use a different type of flour?
Yes, you can use gluten-free flour, but the texture may vary slightly. -
What if I don’t have boiling water?
You can heat water in the microwave or on the stove until it boils. -
How do I prevent my cake from sticking?
Ensure your pans are well-greased and floured, or use parchment paper. -
Can I make this cake ahead of time?
Absolutely! Bake the cake a day in advance and frost it just before serving. -
What can I do if the cake is too dense?
It’s possible the batter was overmixed. Mix just until combined for a fluffier result next time.
Wrapping Up
Now that you have the recipe and tips to create this mouthwatering Decadent Double Layer Chocolate Fudge Cake, it’s time to embrace your inner baker and treat yourself and your loved ones to this extraordinary dessert. Remember, cooking is about enjoyment, love, and sharing memorable moments, so take your time and savor each step. After all, every slice tells a story — what story will yours tell? Happy baking!