
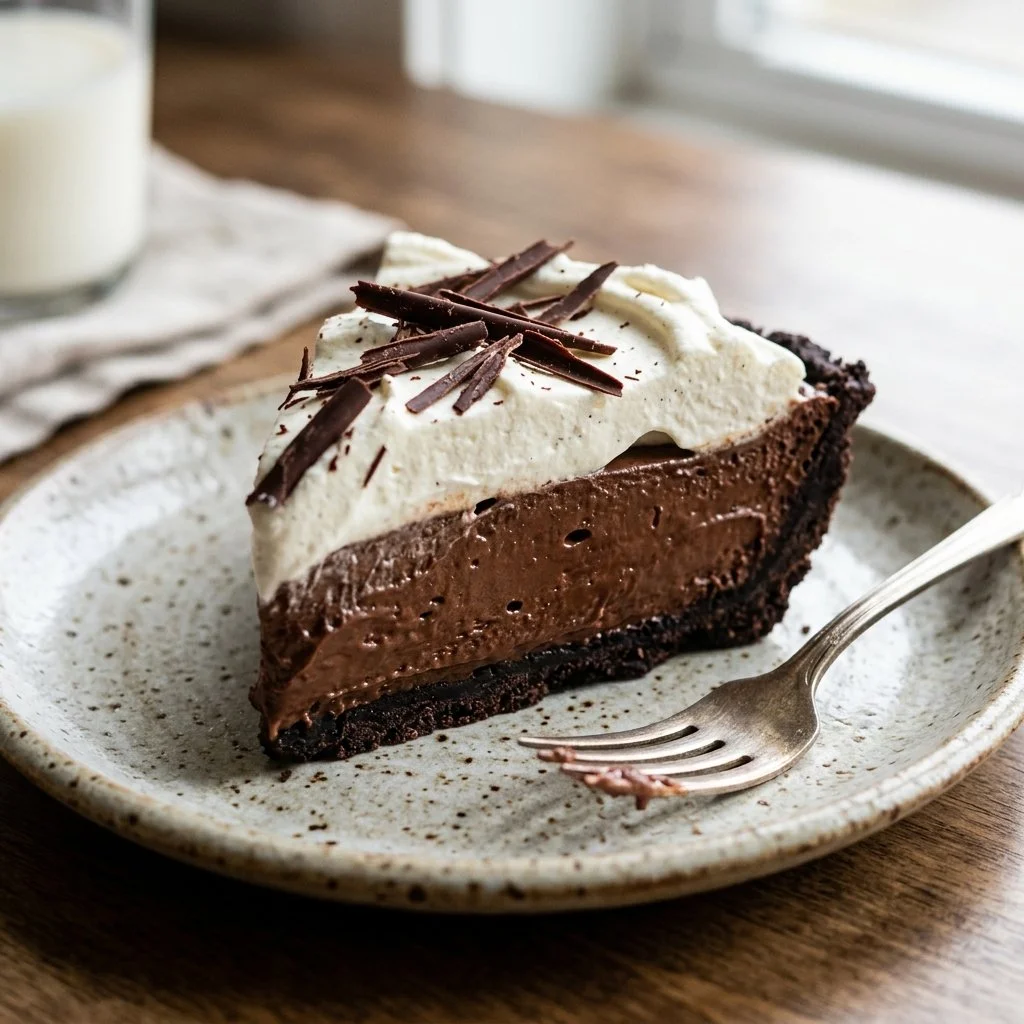
There’s something truly magical about a slice of Chocolate Silk Pie that takes me back to the sunlit afternoons of my childhood. I remember my grandmother, her apron dusted with flour, whisking away in the kitchen while my siblings and I played in the living room. The rich aroma of melted chocolate wafting through the air was like a siren song, luring us into the kitchen to sneak spoonfuls of the luscious filling. Each bite was an indulgent experience—a velvety blend of chocolatey goodness that seemed to melt away not just on our tongues, but even in our worries. Today, I want to share that same warmth and joy with you through my version of this classic dessert.
Recipe Timing
- Prep Duration: 20 minutes
- Active Cooking: 40 minutes
- Total Duration: 4 hours and 30 minutes (including chilling time)
- Portion Size: Serves 8
- Complexity: Simple
Nutritional Recipe
- Calories per portion: Approximately 400
- Protein: 4g per serving
- Carbohydrates: 37g per serving
- Fats: 28g per serving
- Fiber: 2g per serving
- Sugars: 25g per serving
- Sodium: 150mg per serving
Why You’ll Love This Chocolate Silk Pie
In the realm of desserts, this pie stands out with its luxuriously smooth texture and deep chocolate flavor. It’s indulgent yet surprisingly simple to prepare, making it a perfect centerpiece for any gathering. The pie’s velvety filling perfectly contrasts with the crispness of the pre-made crust, creating a delightful experience for your taste buds. Plus, who can resist a fluffy layer of whipped cream that crowns this decadent treat? It’s not just a dessert; it’s an experience that evokes nostalgia and is sure to impress your friends and family.
The Complete Cooking Journey
Embarking on this baking adventure is a thrilling way to rediscover the joy of cooking. Each step is infused with love, from the gentle melting of the chocolate to the careful whisking of cream. It’s about creating a moment that transforms simple ingredients into something extraordinary. With a little patience and passion, you’ll have a show-stopping Chocolate Silk Pie worthy of any celebration!
Ingredients:
- 1 pre-made pie crust
- 4 oz dark chocolate, chopped
- 4 oz unsweetened chocolate, chopped
- 1/2 cup unsalted butter, softened
- 1 cup granulated sugar
- 3 large eggs
- 1 tsp vanilla extract
- 1 cup heavy whipping cream
Method:
Step 1: Preheat Your Oven
Preheat your oven to 350°F (175°C). Bake the pie crust according to package instructions and let it cool completely. This forms the perfect base for the indulgent filling you’re about to create.
Step 2: Melt the Chocolates
In a heatproof bowl, combine the chopped dark and unsweetened chocolate. Set this bowl over a pot of simmering water. Stir gently until melted and smooth. Once melted, set aside to cool slightly—this will ensure your filling doesn’t cook the eggs later.
Step 3: Cream the Butter and Sugar
In a large mixing bowl, beat the softened butter and sugar together until the mixture is light, fluffy, and pale in color. This step is essential as it incorporates air into the mixture, making your pie wonderfully light.
Step 4: Add the Eggs
Add the eggs one at a time into the butter-sugar mixture, beating well after each addition. This careful incorporation helps to build structure. Once fully mixed, stir in your vanilla extract for that inviting aroma.
Step 5: Combine with Chocolate
Gently mix in the cooled melted chocolate until the mixture is fully combined. Picture the deep, rich chocolate folding into the creamy base, creating a luscious filling that you’ll be eager to savor.
Step 6: Fill the Pie Crust
Pour the silky chocolate mixture into the cooled pie crust, smoothing the top with a spatula. This is when the magic happens, as it begins to transform into the lavish dessert of your dreams. Cover it loosely with plastic wrap and refrigerate for at least 4 hours.
Step 7: Whip the Cream
Just before serving, whip the heavy cream to stiff peaks. This step embodies sweetness and lightness; gently spread the whipped cream over the top of the chilled pie, adding a beautiful finish.
Serving Suggestions & Pairings
Serve this indulgent Chocolate Silk Pie with a fresh berry compote or a drizzle of raspberry sauce for a tart contrast. A scoop of vanilla ice cream or a hot cup of coffee pairs beautifully with the rich chocolate, making for a well-rounded dessert experience.
Storage & Leftovers Guide
If you find yourself with leftovers (a big if!), store the pie covered in the refrigerator. It’ll keep well for up to 3 days. Be sure to add the whipped cream just before serving to maintain that fluffy texture.
Kitchen Wisdom & Success Tips
- Room Temperature Ingredients: Make sure your butter and eggs are at room temperature for easier mixing and a smoother texture.
- Chocolate Melting: Don’t rush the melting process; chocolate burns easily. Stir gently and keep an eye on it.
- Cooling the Chocolate: Allow the chocolate to cool slightly before adding eggs. This prevents the eggs from scrambling.
Flavor Variations & Adaptations
For a twist, consider adding a splash of espresso powder to enhance the chocolate flavor or infuse the whipped cream with a hint of peppermint extract for a seasonal treat. Vegan alternatives can be achieved using plant-based butter and aquafaba in place of eggs.
Reader Questions & Solutions
-
Is there a chocolate alternative if I don’t like dark chocolate?
- Absolutely! You can use semi-sweet chocolate instead for a sweeter flavor.
-
What if I can’t find a pre-made pie crust?
- No worries! You can make a simple graham cracker crust or even a shortcrust pastry from scratch.
-
How can I make it gluten-free?
- Use a gluten-free pie crust, and ensure all ingredients are certified gluten-free.
-
My pie didn’t set; what went wrong?
- Ensure that the filling is properly cooled before refrigerating, and make sure to allow enough time for it to set in the fridge.
-
Can I use less sugar?
- Yes, but remember that sugar helps create the perfect texture and stability. Reducing it may alter the final result slightly.
Wrapping Up
As you savor your first bite of this Chocolate Silk Pie, I hope it transports you to your own memories and warms your heart just as it has for me. Cooking is not just about the food; it’s about creating connections, evoking memories, and sharing joys. So gather your loved ones, slice into that luscious pie, and celebrate! Happy baking!
PrintChocolate Silk Pie
A decadent and smooth Chocolate Silk Pie that evokes nostalgic memories of childhood with its rich chocolate filling and creamy topping.
- Prep Time: 20 minutes
- Cook Time: 40 minutes
- Total Time: 270 minutes
- Yield: 8 servings 1x
- Category: Dessert
- Method: Baking
- Cuisine: American
- Diet: Vegetarian
Ingredients
- 1 pre-made pie crust
- 4 oz dark chocolate, chopped
- 4 oz unsweetened chocolate, chopped
- 1/2 cup unsalted butter, softened
- 1 cup granulated sugar
- 3 large eggs
- 1 tsp vanilla extract
- 1 cup heavy whipping cream
Instructions
- Preheat your oven to 350°F (175°C). Bake the pie crust according to package instructions and let it cool completely.
- Melt the chocolates in a heatproof bowl set over simmering water until smooth.
- Cream the softened butter and sugar together until light and fluffy.
- Add the eggs one at a time, beating well after each addition, and then stir in vanilla extract.
- Combine the cooled melted chocolate into the butter-sugar mixture until fully integrated.
- Fill the cooled pie crust with the chocolate mixture and smooth the top with a spatula. Cover and refrigerate for at least 4 hours.
- Whip the heavy cream to stiff peaks and spread it over the chilled pie before serving.
Notes
For best results, use room temperature eggs and butter, and allow the chocolate to cool before mixing with eggs. Store leftovers in the refrigerator for up to 3 days.
Nutrition
- Serving Size: 1 slice
- Calories: 400
- Sugar: 25g
- Sodium: 150mg
- Fat: 28g
- Saturated Fat: 17g
- Unsaturated Fat: 8g
- Trans Fat: 0g
- Carbohydrates: 37g
- Fiber: 2g
- Protein: 4g
- Cholesterol: 80mg