There’s something wonderfully nostalgic about summer days spent at the beach—warm sun on your face, gentle waves lapping at your feet, and the sound of laughter floating through the salty air. One of my fondest memories is of carefree afternoons playing volleyball with friends, sharing stories over snacks, and indulging in sweet treats that would melt in your mouth. This Beach Ball Cake perfectly embodies those joyful moments, combining cheerful colors and flavors that will transport you straight to your happy place.
When my kids spotted a similar cake in a bakery during a recent trip, their eyes lit up with pure delight. They begged me to bring home the beach ball cake, but I knew that the only way to truly celebrate our love for the beach was to create it together at home. So, armed with a few ingredients and a sprinkle of creativity, we embarked on an adventure in the kitchen, and the result was nothing short of spectacular!
## Recipe Timing
- Prep Duration: 1 hour
- Active Cooking: 45 minutes
- Total Duration: 2 hours
- Portion Size: 12 servings
- Complexity: Moderate
## Nutritional Recipe
- Calories per portion: Approximately 400
- Protein: 4g
- Carbs: 58g
- Fats: 18g
- Fiber: 1g
- Sugars: 37g
- Sodium: 220mg
## Why You’ll Love This Beach Ball Cake
Not just a feast for the eyes, this Beach Ball Cake is a delicious blend of fluffy vanilla cake and luscious vanilla buttercream filling. Topped with vibrant fondant that brings a playful beach ball design to life, it’s perfect for birthdays, summer celebrations, or just because you feel like making dessert special. Plus, the satisfaction of creating this colorful cake with your loved ones is what truly makes it unforgettable!
## The Complete Cooking Journey
Join me through this delightful adventure of creating the perfect Beach Ball Cake. With each step, I’ll guide you through the process and share tips for success. From mixing the batter and layering the cake to rolling out fondant and adding those charming finishing touches, you’ll see just how much fun it can be to bake!
## Ingredients:
FOR THE VANILLA CAKE
- All-purpose flour – 2½ cups
- Baking powder – 2½ tsp
- Salt – ½ tsp
- Unsalted butter – 1 cup, softened
- Granulated sugar – 1¾ cups
- Eggs – 4 large
- Whole milk – 1 cup
- Vanilla extract – 1 tbsp
FOR THE FILLING
- Strawberry or raspberry jam – ½ cup, warmed and strained
- Vanilla buttercream – 2½ cups, for layering and crumb coating
FOR THE FONDANT COVERING AND DECORATIONS
- Red, yellow, blue, green, white, and orange fondant
- Edible glue or water, for assembling fondant strips
- Small fondant seashells and mini flip-flops
- Crushed graham crackers
- Cookie crumbs or crushed vanilla wafers
- White fondant circle, for the beach ball button
## Method:
### Step 1: Preheat the Oven and Prep the Pans
Preheat your oven to 350°F (175°C). Grease and flour spherical cake pans or round cake pans that you can stack and carve into the shape of a beach ball.
### Step 2: Cream the Butter and Sugar
In a large mixing bowl, cream together the softened unsalted butter and granulated sugar until the mixture is light and fluffy. This will take about 3-5 minutes.
### Step 3: Add the Eggs and Vanilla
Beat in the eggs one at a time, ensuring each egg is fully incorporated before adding the next. Finally, mix in the vanilla extract, creating a sweet base for your cake.
### Step 4: Combine Dry Ingredients
In a different bowl, whisk together the all-purpose flour, baking powder, and salt. This step helps to distribute the leavening agents evenly throughout the flour.
### Step 5: Mix the Cake Batter
Gradually add the dry ingredients to the wet mixture in three additions, alternating with the whole milk. Mix until just combined, being careful not to over-mix the batter.
### Step 6: Bake the Cakes
Divide the cake batter evenly between your prepared pans. Bake for 40 to 45 minutes, or until a skewer inserted into the center comes out clean. Let the cakes cool completely in the pans before gently removing them.
### Step 7: Slice and Layer the Cake
Once the cakes are fully cooled, carefully slice each cake into three horizontal layers. Spread a thin layer of warmed and strained jam on each layer, then follow with a layer of vanilla buttercream. Stack the layers neatly in a single tier.
### Step 8: Crumb Coat the Cake
Apply a thin, even layer of buttercream over the entire cake to lock in crumbs. Pop the cake into the fridge for at least one hour; this helps firm it up for fondant application.
### Step 9: Roll Out Fondant
While the cake is chilling, roll out each color of fondant into long triangular panels, making sure they taper towards the top. Measure the dimensions against your cake as you go for an accurate fit.
### Step 10: Apply Fondant Strips
Starting from the top of the chilled cake, alternate colors of fondant panels, applying them downward. Use a brush with a bit of water or edible glue to secure the edges of each panel as you work around the cake.
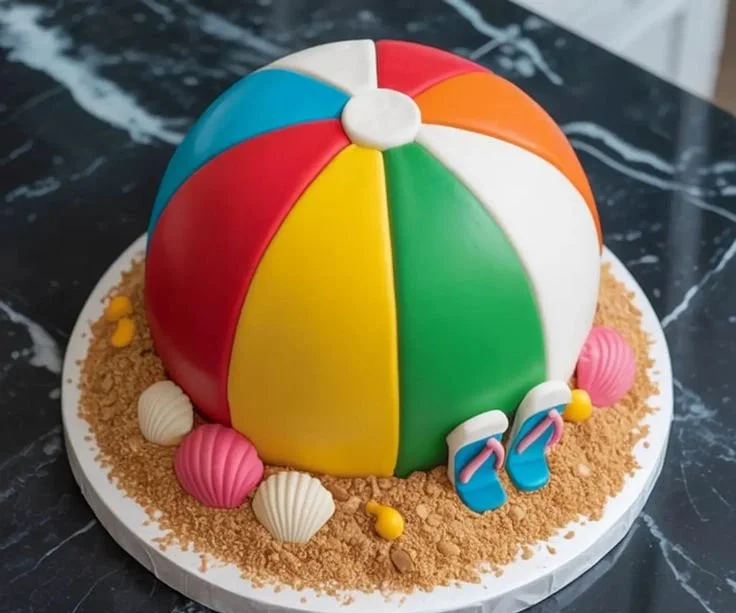
### Step 11: Finish with Button and Decorations
Cut out a white fondant circle and place it at the top of the cake where the colored panels meet. Decorate the base with adorable fondant flip-flops and seashells, pressing them gently into the cake for added effect.
### Step 12: Add Edible Sand
Sprinkle crushed graham crackers and cookie crumbs around the base of the cake to resemble sand. Lightly press to help it adhere, giving your cake that beachy vibe.
### Step 13: Final Touches
Smooth out any fondant seams with a damp finger or fondant smoother for a polished look. Store the cake in a cool area until you’re ready to serve it and enjoy!
## Serving Suggestions & Pairings
This cake is a star on its own, but it pairs beautifully with a light whipped cream topping or a scoop of vanilla ice cream. Serve it alongside fruity drinks like lemonades or iced teas for a refreshing twist.
## Storage & Leftovers Guide
Store any leftover cake in an airtight container in the fridge for up to 3 days. For longer storage, wrap slices tightly in plastic wrap and freeze for up to 2 months. Simply thaw at room temperature before enjoying the sweet taste of summer.
## Kitchen Wisdom & Success Tips
- Ensure all your ingredients are at room temperature before mixing for the best texture.
- If fondant is too sticky, dust your work surface lightly with cornstarch or powdered sugar.
- Don’t rush the chilling process—it truly helps achieve a neat finish with fondant!
## Flavor Variations & Adaptations
Feel free to experiment with different jam flavors, like peach or apricot, for a unique twist. You could even replace the vanilla buttercream with chocolate or cream cheese frosting to change things up!
## Reader Questions & Solutions
-
What if my cake layers crumble when slicing?
- Ensure that the cake is completely cooled before slicing and use a serrated knife for cleaner edges.
-
Can I make this cake in advance?
- Absolutely! You can bake and freeze the cake layers up to two weeks in advance, thaw, and then decorate on the day of serving.
-
How do I apply the fondant perfectly?
- Make sure the crumb coat is chilled and set—this helps the fondant stick without sliding and creates a smoother finish.
-
Do I have to use fondant for covering?
- If fondant isn’t your thing, you can simply use additional buttercream frosting to decorate the cake.
-
What can I substitute for eggs?
- Try unsweetened applesauce or a commercial egg replacer if you prefer a vegan version!
## Wrapping Up
This Beach Ball Cake is more than just a dessert; it’s a playful symbol of sunshine, laughter, and shared moments with family and friends. As you dive into creating this delightful treat, remember to enjoy the process as much as the sweet reward. Whether it’s a birthday bash or an everyday celebration, this cake is sure to light up faces and hearts alike. So gather your ingredients, roll up your sleeves, and let the fun begin—happy baking!
PrintBeach Ball Cake
A delightful Beach Ball Cake that combines fluffy vanilla cake with vibrant fondant, perfect for summer celebrations.
- Prep Time: 60 minutes
- Cook Time: 45 minutes
- Total Time: 120 minutes
- Yield: 12 servings 1x
- Category: Dessert
- Method: Baking
- Cuisine: American
- Diet: Vegetarian
Ingredients
- 2½ cups all-purpose flour
- 2½ tsp baking powder
- ½ tsp salt
- 1 cup unsalted butter, softened
- 1¾ cups granulated sugar
- 4 large eggs
- 1 cup whole milk
- 1 tbsp vanilla extract
- ½ cup strawberry or raspberry jam, warmed and strained
- 2½ cups vanilla buttercream, for layering and crumb coating
- Red, yellow, blue, green, white, and orange fondant
- Edible glue or water, for assembling fondant strips
- Small fondant seashells and mini flip-flops
- Crushed graham crackers
- Cookie crumbs or crushed vanilla wafers
- White fondant circle, for the beach ball button
Instructions
- Preheat your oven to 350°F (175°C) and grease the pans.
- Cream together the softened butter and sugar until light and fluffy.
- Beat in the eggs one at a time, then mix in the vanilla extract.
- Whisk together the flour, baking powder, and salt in a different bowl.
- Add the dry ingredients to the wet mixture alternately with the whole milk.
- Divide the batter between the prepared pans and bake for 40-45 minutes.
- Cool the cakes completely before removing from the pans.
- Slice each cake into three horizontal layers.
- Spread a thin layer of jam and buttercream on each layer, stacking them neatly.
- Apply a crumb coat of buttercream over the whole cake and chill for at least one hour.
- Roll out fondant into long triangular panels.
- Starting from the top, apply the fondant strips around the cake.
- Cut out a white fondant circle and place it on top of the cake.
- Sprinkle the base with crushed graham crackers to resemble sand.
- Smooth out any seams with a damp finger and store until serving.
Notes
Store leftover cake in an airtight container in the fridge for up to 3 days. For longer storage, wrap in plastic wrap and freeze.
Nutrition
- Serving Size: 1 slice
- Calories: 400
- Sugar: 37g
- Sodium: 220mg
- Fat: 18g
- Saturated Fat: 10g
- Unsaturated Fat: 8g
- Trans Fat: 0g
- Carbohydrates: 58g
- Fiber: 1g
- Protein: 4g
- Cholesterol: 90mg