
There’s something undeniably magical about the first slice of a red velvet cake. The moment the knife glides through the soft, crimson layers, revealing the creamy frosting within, your heart skips a beat. It takes you to another world, one filled with sweet memories of celebrations: birthday parties, weddings, and even family gatherings. I remember the first time I laid eyes on a red velvet cake—it was at my childhood friend’s birthday party. The vibrant color was mesmerizing, and when I tasted it, I knew I’d found a lifelong love. This recipe is a tribute to those moments and to the boundless joy that comes from baking and sharing deliciousness.
Recipe Timing
- Prep Duration: 20 minutes
- Active Cooking: 30 minutes
- Total Duration: 50 minutes + cooling time
- Portion Size: 12 servings
- Complexity: Simple
Nutritional Recipe
- Calories per portion: Approximately 320
- Protein: 4g
- Carbs: 45g
- Fats: 15g
- Fiber: 1g
- Sugars: 30g
- Sodium: 300mg
Why You’ll Love This Red Velvet Cake Recipe
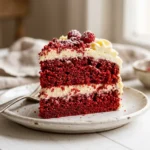
This red velvet cake not only looks stunning with its rich, crimson hue but also delivers a moist, tender crumb that melts in your mouth. The subtle hint of cocoa powder isn’t just for aesthetics; it adds a depth of flavor that complements the sweetness perfectly. Topped with a luscious cream cheese frosting, each bite delivers a delightful blend of tangy and sweet, making it the perfect dessert for special occasions or a cozy night in.
The Complete Cooking Journey
Start by firing up your oven and preparing your cake pans, then dive into the magic of mixing your ingredients. The vibrant red batter will be a feast for the eyes, and as it bakes, your kitchen will be filled with the most inviting aroma. Patience is key as the cakes cool before you lavish them with frosting—trust me, it’s worth the wait!
Ingredients
- 2 1/2 cups all-purpose flour
- 1 1/2 cups granulated sugar
- 1 teaspoon baking soda
- 1 teaspoon salt
- 1 teaspoon cocoa powder
- 1 1/2 cups vegetable oil
- 1 cup buttermilk, room temperature
- 2 large eggs, room temperature
- 2 tablespoons red food coloring
- 1 teaspoon vanilla extract
- 1 teaspoon white vinegar
Method
Step 1: Preheat the Oven
Preheat the oven to 350°F (175°C). Grease and flour two 9-inch round cake pans, ensuring they are well-prepared to release the cakes easily after baking.
Step 2: Sift the Dry Ingredients
In a large bowl, sift together the flour, sugar, baking soda, salt, and cocoa powder. This ensures a light and fluffy cake and prevents any lumps from forming.
Step 3: Mix the Wet Ingredients
In another bowl, whisk together the vegetable oil, buttermilk, eggs, red food coloring, vanilla extract, and white vinegar until well combined. This creates a beautifully vibrant mixture that’s a landmark of any red velvet cake.
Step 4: Combine the Mixtures
Gradually add the dry ingredients to the wet mixture, stirring gently until just combined. Be careful not to overmix; a few lumps are perfectly fine.
Step 5: Prepare for Baking
Divide the batter evenly between the prepared cake pans and smooth the tops with a spatula to ensure even baking.
Step 6: Bake the Cakes
Bake in the preheated oven for 25-30 minutes or until a toothpick inserted in the center comes out clean. Your kitchen will be enveloped in the sweet aroma of vanilla and chocolate.
Step 7: Cool the Cakes
Once baked, let the cakes cool in the pans for 10 minutes before gently turning them out onto wire racks to cool completely. Resist the urge to frost them too soon!
Step 8: Frost and Serve
Once the cakes have cooled, frost generously with cream cheese frosting, layering if desired, and serve. Enjoy the smiles as you share this piece of joy!
Serving Suggestions & Pairings
Serve your red velvet cake with a cup of freshly brewed coffee or a glass of cold milk. It’s the perfect pairing that balances the sweetness and enhances the flavor. For a touch of elegance, consider garnishing with red berries or a sprinkle of chopped pecans on top.
Storage & Leftovers Guide
To store leftovers, cover the cake with plastic wrap or place it in an airtight container. The cake will stay fresh at room temperature for up to three days, or you can refrigerate it for up to a week. If you decide to freeze it, wrap the pieces tightly in plastic wrap and aluminum foil, and they will keep for about three months.
Kitchen Wisdom & Success Tips
- For even layers, use a kitchen scale to measure the batter into each pan.
- Ensure your ingredients are at room temperature for the best mixing results.
- If you run out of buttermilk, you can make a quick substitute by mixing 1 cup of milk with 1 tablespoon of vinegar or lemon juice; let it sit for 5 minutes before using.
Flavor Variations & Adaptations
Want to switch things up? You can experiment with different frostings like a chocolate ganache or a vanilla buttercream. For a fun twist, consider adding a layer of raspberry or strawberry jam between the layers for extra flavor!
Reader Questions & Solutions
-
Can I make this cake without food coloring?
- Yes, you can omit the food coloring for a cocoa-flavored cake; just remember that it won’t have the signature red hue.
-
What can I use instead of buttermilk?
- You can substitute buttermilk with plain yogurt thinned with a little water, or use the vinegar and milk method mentioned earlier.
-
Why is my cake dry?
- Dry cake can result from overmixing or baking for too long. Follow the toothpick test for doneness to avoid this.
-
Can I use gluten-free flour?
- Absolutely! Use a 1:1 gluten-free flour blend to achieve a similar texture.
-
What frosting pairs best with red velvet cake?
- Cream cheese frosting is traditional, but feel free to try Italian meringue buttercream for a lighter option.
Wrapping Up
Baking this red velvet cake is more than just a culinary task; it’s a labor of love that connects you to your loved ones through shared memories and joyful moments. Whether it’s a birthday celebration, an anniversary, or simply a desire to create something beautiful in the kitchen, this recipe is sure to bring smiles to your table. So gather your ingredients, put on your apron, and let’s bake a cake that holds more than just flavor—it carries the essence of happiness!
PrintRed Velvet Cake
A stunning red velvet cake that delivers a moist crumb and rich flavor, topped with luscious cream cheese frosting. Perfect for special occasions or cozy nights in.
- Prep Time: 20 minutes
- Cook Time: 30 minutes
- Total Time: 50 minutes
- Yield: 12 servings 1x
- Category: Dessert
- Method: Baking
- Cuisine: American
- Diet: Vegetarian
Ingredients
- 2 1/2 cups all-purpose flour
- 1 1/2 cups granulated sugar
- 1 teaspoon baking soda
- 1 teaspoon salt
- 1 teaspoon cocoa powder
- 1 1/2 cups vegetable oil
- 1 cup buttermilk, room temperature
- 2 large eggs, room temperature
- 2 tablespoons red food coloring
- 1 teaspoon vanilla extract
- 1 teaspoon white vinegar
Instructions
- Preheat the oven to 350°F (175°C). Grease and flour two 9-inch round cake pans.
- Sift together the flour, sugar, baking soda, salt, and cocoa powder in a large bowl.
- Whisk together the vegetable oil, buttermilk, eggs, red food coloring, vanilla extract, and white vinegar in another bowl.
- Add the dry ingredients to the wet mixture gradually, stirring gently until just combined.
- Divide the batter evenly between the prepared cake pans and smooth the tops with a spatula.
- Bake in the preheated oven for 25-30 minutes or until a toothpick inserted in the center comes out clean.
- Let the cakes cool in the pans for 10 minutes before turning them out onto wire racks.
- Frost the cooled cakes generously with cream cheese frosting and serve.
Notes
For even layers, use a kitchen scale to measure the batter into each pan. Store leftovers in an airtight container.
Nutrition
- Serving Size: 1 slice
- Calories: 320
- Sugar: 30g
- Sodium: 300mg
- Fat: 15g
- Saturated Fat: 3g
- Unsaturated Fat: 12g
- Trans Fat: 0g
- Carbohydrates: 45g
- Fiber: 1g
- Protein: 4g
- Cholesterol: 40mg