The Fourth of July is one of those cherished occasions that calls for laughter, love, and, of course, vibrant food that captures the spirit of celebration. I remember the first time I tried a red, white, and blue dessert—my grandmother had whipped up a glorious feast of dishes, but nothing captured my heart quite like her colorful cheesecake. As I savored each creamy slice, it was more than just dessert; it was a memory I’ve carried with me into every festive gathering since.
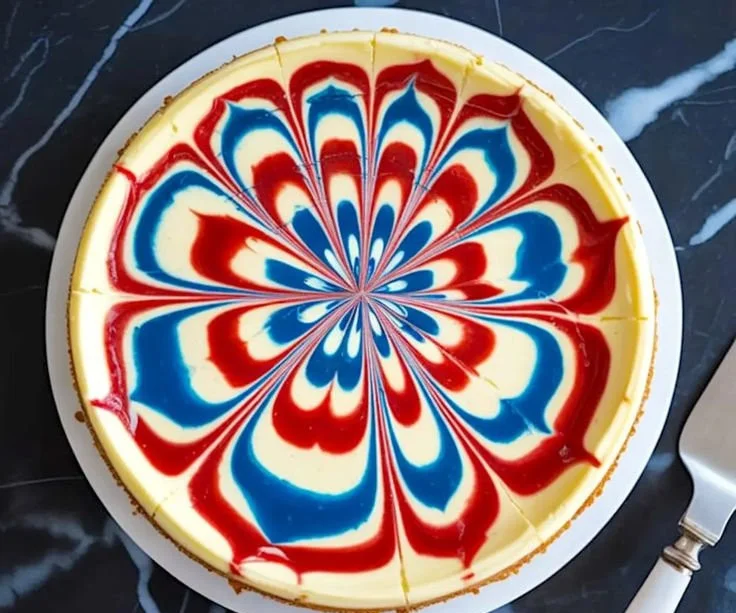
This Patriotic Swirl Cheesecake embodies that same joyous spirit, combining the rich flavors of traditional cheesecake with a stunning swirl of red and blue. It’s perfect for summer BBQs, family picnics, or any celebration worth captivating your guests’ hearts and appetites. Let’s dive into the recipe so you can create your own slice of nostalgia this holiday!
Recipe Timing
- Prep Duration: 30 minutes
- Active Cooking: 1 hour
- Total Duration: About 6 hours (includes chilling)
- Portion Size: Serves 10-12
- Complexity: Moderate
Nutritional Recipe
- Calories per portion: 350
- Protein: 7g
- Carbs: 27g
- Fats: 26g
- Fiber: 0g
- Sugars: 15g
- Sodium: 250mg
Why You’ll Love This Patriotic Swirl Cheesecake
This cheesecake doesn’t just look festive; it tastes heavenly. Each velvety slice melts in your mouth, with the sweetness of the cream cheese balanced perfectly by the buttery graham cracker crust. The vibrant swirls of red and blue not only create a visual delight but add a playful twist that delights both kids and adults. Perfect for sharing or serving solo after a great meal, this cheesecake will undoubtedly make you the standout star of your summer festivities.
The Complete Cooking Journey
Step into the kitchen with me, and let’s embark on this gratifying culinary adventure. First, you’ll prepare the crust that sets the foundation for our cheesecake. Then, we’ll whip up the creamy filling, dye it with bold colors, and create those breathtaking swirls. Finally, we’ll bake it to light, fluffy perfection. Stay tuned as we guide you through each step of this fun-filled process!
Ingredients:
FOR THE CRUST
- 2 cups graham cracker crumbs
- 1/2 cup melted unsalted butter
- 1/4 cup granulated sugar
FOR THE FILLING
- 4 (8 oz) packages full-fat cream cheese, room temperature
- 1 cup granulated sugar
- 1 cup sour cream, room temperature
- 1 tablespoon pure vanilla extract
- 4 large eggs, room temperature
- Red gel food coloring
- Blue gel food coloring
FOR THE SWIRL DESIGN
- 3 tablespoons of the main cheesecake batter
- Extra red and blue gel food coloring
Method:
Step 1: Prep the Pan
Preheat the oven to 325°F (163°C). Line the bottom of a 9-inch springform pan with parchment paper. Wrap the outside tightly with foil to prevent water from leaking in during the water bath.
Step 2: Make the Crust
Combine graham cracker crumbs, granulated sugar, and melted butter in a mixing bowl. Stir until the mixture resembles wet sand. Press it firmly and evenly into the bottom of the prepared springform pan. Bake for 10 minutes, then set aside to cool while you prepare the filling.
Step 3: Beat the Cream Cheese
In a stand mixer fitted with the paddle attachment, beat the cream cheese on medium speed until completely smooth, about 2 minutes. Scrape down the sides of the bowl as needed to eliminate lumps.
Step 4: Add Sugar and Mix
Add the granulated sugar to the cream cheese and beat again until well combined and smooth. Scrape the bowl again to ensure an even texture.
Step 5: Incorporate Sour Cream and Vanilla
Add the sour cream and vanilla extract to the mixture. Mix on medium speed until everything is fully incorporated and the batter is creamy and uniform.
Step 6: Add Eggs
Add the eggs one at a time, mixing on low speed after each addition just until combined. Avoid overmixing to prevent excess air in the batter, which can lead to cracks during baking.
Step 7: Color a Portion of Batter
Scoop out about 1 cup of the finished batter and divide it evenly between two small bowls. Tint one bowl with red gel food coloring and the other with blue gel food coloring. Mix each until the color is fully saturated and vibrant.
Step 8: Assemble the Layers
Pour the remaining white batter into the cooled crust and smooth the top. Drop alternating spoonfuls of red and blue batter over the surface in a loose spiral pattern to prepare for swirling.
Step 9: Create Surface Swirls
Use a clean toothpick or skewer to drag lines from the center outward like pie slices, forming a starburst swirl pattern. Clean the toothpick occasionally for clean lines.
Step 10: Swirl into the Filling
To carry the swirl design deeper into the cheesecake, gently insert the toothpick into the batter and push down slightly in several spots. Then, use the tip of a knife or skewer to lightly swirl within the filling without overmixing. This creates streaks of color inside the cheesecake without blending into muddy tones.
Step 11: Bake in Water Bath
Place the springform pan inside a larger roasting pan. Pour hot water into the outer pan until it reaches halfway up the sides of the springform. Carefully transfer to the oven and bake for 55–70 minutes, or until the center is mostly set but still slightly wobbly when gently shaken.
Step 12: Cool and Chill
Turn off the oven and crack the door open. Let the cheesecake rest inside for 1 hour to cool gradually. Remove it from the water bath, unwrap the foil, and refrigerate for at least 4–6 hours, preferably overnight, before slicing and serving.
Serving Suggestions & Pairings
This dazzling cheesecake pairs wonderfully with fresh berries or a dollop of whipped cream on top. A light raspberry or blueberry sauce drizzled over the cheesecake adds a delightful tang and a splash of flavor. Serve it against the backdrop of a summer picnic tablecloth, accompanied by iced tea or lemonade for a refreshing treat that sings of summer.
Storage & Leftovers Guide
If you have any leftovers (though I doubt it!), store the cheesecake in an airtight container in the refrigerator, where it will keep for up to 5 days. You can also freeze individual slices wrapped tightly in plastic wrap followed by foil for up to three months; just let them thaw in the fridge overnight before serving.
Kitchen Wisdom & Success Tips
- Ensure all your ingredients are at room temperature for the creamiest texture.
- If you want to avoid cracks in your cheesecake, don’t overmix once you add the eggs.
- Using a water bath helps create a moist baking environment that prevents the cheesecake from drying out and cracking.
- For a less-sweet version, you can reduce the sugar by 1/4 cup; it still tastes fantastic!
Flavor Variations & Adaptations
Feel free to play around with flavors! You can add a teaspoon of almond extract for a nutty twist or fold in some lemon zest for added brightness. Seasonal fruit purees can also be fun incorporated into the batter for extra fruity swirls!
Reader Questions & Solutions
- Can I make this cheesecake a day ahead? Absolutely! In fact, making it a day ahead allows the flavors to meld beautifully.
- My cheesecake cracked while baking. What did I do wrong? Cracks often occur due to overmixing or baking at a temperature that’s too high. Always mix on low once the eggs are added, and consider using a water bath.
- Can I use low-fat cream cheese? While you can, remember that low-fat versions might not create the same rich and creamy texture traditional full-fat cream cheese gives.
- What can I substitute for graham crackers? You can use Digestive biscuits or even Oreo cookie crumbs for a different flavor profile!
- How do I know when my cheesecake is done? The edges should be set, but the center should still have a slight jiggle when you shake it gently.
Wrapping Up
This Patriotic Swirl Cheesecake is more than just a dessert; it’s a celebration of flavors, colors, and memories. As you create it, envision the smiles on your loved ones’ faces when they take that first delightful bite. Cooking is like sharing a piece of your heart with those you cherish; this cheesecake just might become your new favorite tradition. I hope you enjoy making it as much as I do! Happy celebrating and happy eating!