There’s a little corner of my memory that’s forever flooded with the scent of freshly baked cheesecake. It’s a nostalgic reminder of family gatherings, where we gathered around exuberant tables filled with laughter and love, sharing stories as sweet as the desserts we indulged in. One of the highlights of those occasions was always the cheesecake. This Greek Honey Pistachio Cheesecake Bars recipe is my modern take on that cherished childhood favorite, inviting you to experience the same warmth and joy in your kitchen.
Recipe Timing
- Prep Duration: 20 minutes
- Active Cooking: 40 minutes
- Total Duration: 3 hours 30 minutes (including cooling and chilling)
- Portion Size: Serves 9
- Complexity: Simple
Nutritional Recipe
- Calories per portion: Approximately 320
- Protein: 6 grams per serving
- Carbs: 28 grams per serving
- Fats: 21 grams per serving
- Fiber: 1 gram per serving
- Sugars: 18 grams per serving
- Sodium: 180 mg per serving
Why You’ll Love This Greek Honey Pistachio Cheesecake Bars
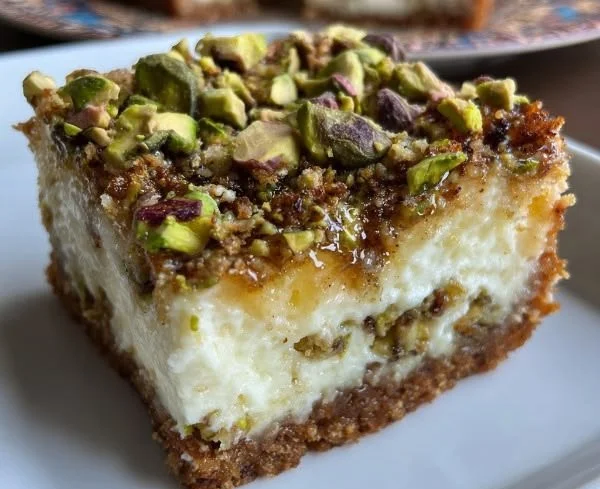
Imagine a crunchy, buttery graham cracker crust cradling a creamy, luscious cheesecake filling. The Greek yogurt adds a delightful tang that plays perfectly with the sweetness of honey, while the toasted pistachios provide a satisfying crunch and a hint of sophistication. Each bite is a harmonious blend of textures and flavors, making these bars the ideal companion for both casual gatherings and special celebrations.
The Complete Cooking Journey
Step 1: Prepare Your Oven and Pan
Start by preheating your oven to 350°F (175°C) and lining an 8×8-inch pan with parchment paper. This will ensure that your cheesecake bars come out easily once they’re ready.
Step 2: Combine Dry Ingredients for the Crust
In a medium bowl, mix together 1 ½ cups of graham cracker crumbs, ¼ cup of granulated sugar, and ¼ teaspoon of salt. These elements are the base for the lush cheesecake that’s to come.
Step 3: Blend in the Butter
Pour in 6 tablespoons of melted unsalted butter and stir until all the dry ingredients are evenly moistened. This buttery mixture forms the foundation of your bars, creating that beloved crunch.
Step 4: Bake the Crust
Press the crust mixture firmly into the bottom of the prepared pan and bake it in the oven for 8 to 10 minutes until it turns a beautiful golden brown. Upon removing, let it cool completely to allow the cheesecake filling to set properly.
Step 5: Lower the Oven Temp
Once your crust has cooled, reduce the oven temperature to 325°F (160°C). This lower temperature is crucial for baking the cheesecake filling evenly.
Step 6: Beat the Cream Cheese
In a large bowl, using an electric mixer, beat 16 ounces of softened cream cheese until it’s smooth and creamy. This is the rich base of your cheesecake that will form the heart of your bars.
Step 7: Add the Remaining Filling Ingredients
To the cream cheese, mix in ¼ cup of Greek yogurt, ½ cup of honey, 2 large eggs, 1 teaspoon of vanilla extract, and 1 teaspoon of lemon zest. Blend these together on low speed until everything is well combined and smooth, creating a luscious filling.
Step 8: Pour and Smooth
Pour the cheesecake filling over the cooled crust, using a spatula to spread it evenly. This is where the magic really begins!
Step 9: Bake the Cheesecake
Bake for 25 to 30 minutes, or until the edges are set while the center still slightly jiggles. This slight jiggle indicates that your cheesecake is perfectly creamy and not overbaked.
Step 10: Cool Down
After baking, remove the pan and let the cheesecake cool to room temperature. This step is crucial to ensure it firms up nicely.
Step 11: Chill in the Fridge
Refrigerate the cheesecake bars in the pan for at least 3 hours, allowing them to become firm and slice beautifully.
Step 12: The Finishing Touch
Just before serving, drizzle the bars with 2 tablespoons of honey and sprinkle ½ cup of chopped and toasted pistachios on top for that irresistible crunch. Cut into squares and get ready to savor each bite!
Serving Suggestions & Pairings
Serve these delightful bars with a scoop of vanilla ice cream or a dollop of whipped cream to balance the rich flavors. Pairing them with a cup of herbal tea or a sweet dessert wine can elevate your dessert experience even more.
Storage & Leftovers Guide
Store any leftover cheesecake bars in an airtight container in the refrigerator for up to 5 days. You can also freeze them for up to 3 months; just make sure to wrap them well to prevent freezer burn.
Kitchen Wisdom & Success Tips
- Be sure your cream cheese is at room temperature—it blends more smoothly.
- Don’t overmix the filling after adding the eggs to keep it light and airy.
- Using parchment paper allows for easy removal and cutting.
Flavor Variations & Adaptations
Feel free to swap the pistachios for your favorite nuts, or even fold in some chocolate chips for a chocolaty twist. Different citrus zests, like orange or lime, can also create intriguing flavor profiles!
Reader Questions & Solutions
- How can I tell when my cheesecake is done? Look for the edges to be set and a slight jiggle in the center.
- Why is my cheesecake cracking on top? This can be caused by overbaking or rapid temperature changes; bake at a lower temperature and let it cool gradually.
- Can I use a different type of cracker for the crust? Absolutely! Try using gingersnaps or vanilla wafers for a unique twist.
- What should I do if my bars are too soft? Ensure they have chilled long enough; additional time in the fridge may help firm them up.
- Can I make them gluten-free? Yes! Use gluten-free graham cracker crumbs or alternative flours for the crust.
Wrapping Up
These Greek Honey Pistachio Cheesecake Bars are more than just a dessert—they’re a celebration of flavor, history, and love. I hope they inspire you to gather with friends and family, whip up a batch, and create your own cherished memories around the table. Happy baking!
PrintGreek Honey Pistachio Cheesecake Bars
A delightful blend of creamy cheesecake filling with a crunchy graham cracker crust, infused with Greek yogurt, honey, and toasted pistachios.
- Prep Time: 20 minutes
- Cook Time: 40 minutes
- Total Time: 210 minutes
- Yield: 9 servings 1x
- Category: Dessert
- Method: Baking
- Cuisine: Greek
- Diet: Vegetarian
Ingredients
- 1 ½ cups graham cracker crumbs
- ¼ cup granulated sugar
- ¼ teaspoon salt
- 6 tablespoons unsalted butter, melted
- 16 ounces cream cheese, softened
- ¼ cup Greek yogurt
- ½ cup honey (plus 2 tablespoons for drizzling)
- 2 large eggs
- 1 teaspoon vanilla extract
- 1 teaspoon lemon zest
- ½ cup chopped and toasted pistachios
Instructions
- Preheat your oven to 350°F (175°C) and line an 8×8-inch pan with parchment paper.
- Mix together graham cracker crumbs, sugar, and salt in a medium bowl.
- Pour in melted butter and stir until moistened.
- Press the crust mixture firmly into the bottom of the pan and bake for 8 to 10 minutes.
- Reduce the oven temperature to 325°F (160°C) once the crust has cooled.
- Beat cream cheese in a large bowl until smooth and creamy.
- Add Greek yogurt, honey, eggs, vanilla extract, and lemon zest, mixing until smooth.
- Pour the cheesecake filling over the cooled crust.
- Bake for 25 to 30 minutes, or until the edges are set and center jiggles slightly.
- Cool the cheesecake to room temperature.
- Refrigerate in the pan for at least 3 hours.
- Drizzle with honey and sprinkle with chopped pistachios before serving.
Notes
Ensure cream cheese is at room temperature for better mixing. Parchment paper helps in easy removal of the cheesecake bars.
Nutrition
- Serving Size: 1 bar
- Calories: 320
- Sugar: 18g
- Sodium: 180mg
- Fat: 21g
- Saturated Fat: 10g
- Unsaturated Fat: 11g
- Trans Fat: 0g
- Carbohydrates: 28g
- Fiber: 1g
- Protein: 6g
- Cholesterol: 70mg